How to Fix Windows Network Proxy Settings Error in Windows 10. Sometimes Users have to face Windows Network Proxy Setting Error message appears in their screen duly quoted, “Windows could not automatically detect this Network’s proxy settings“. The main reason behind this error is either corrupt system file or any antivirus may restrict network. You should verify your Proxy server settings to resolve the issue regarding Windows could not detect this network’s proxy settings error.
In addition, Users have also to face several other issues such as difficulty in sites that provide video streaming like YouTube, Vimeo and Netflix.
How to Fix Windows Network Proxy Settings Error in Windows 10
Here, in this article we have brought most possible solution of this error through various ways. Apply any one of them as per your suit.
Ways-1: Ensure Correct Proxy Server Settings
Your Proxy server settings should be proper and you must check it. here is how to check Proxy server settings in Windows 10: –
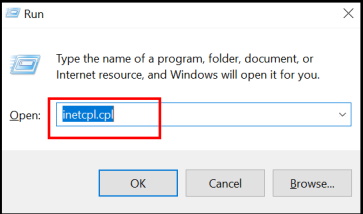
- Press Win + R shortcut key.
- Run command will open.
- Type the command inetcpl.cpl and press Enter.
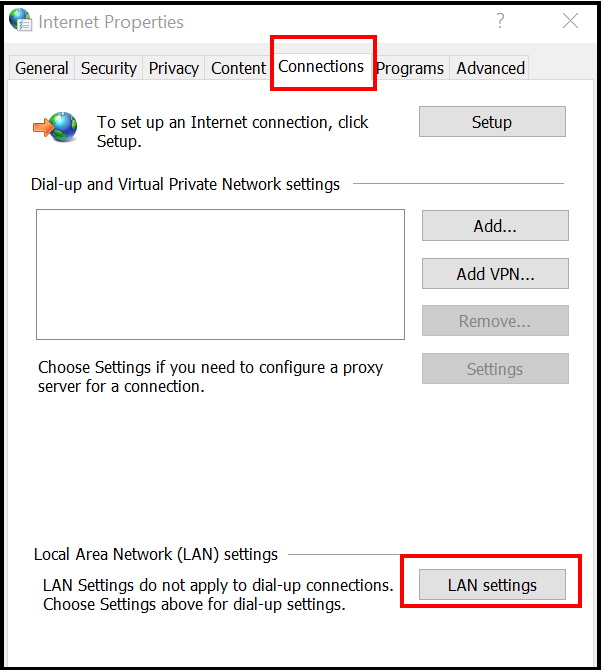
- Now Internet Properties window will open.
- Here go to the Connection tab from the top menu bar.
- Then click on the option LAN Settings.
- Check all the settings here.
- Check and ensure all settings are proper and accurate.
Ways-2: Reset TCP/IP to Fix Windows Network Proxy Settings Error in Windows 10
- Go to Cortana search.
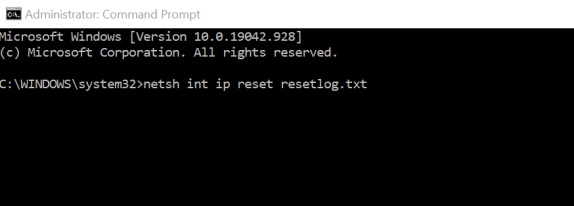
- Type cmd in it and choose the top result as Command Prompt.
- Consequently go to the right side and select the option Run as Administrator.
- Now type the following command and press Enter: –
- netsh int ip reset resetlog.txt
Restart your Windows 10 system and check the issue of regarding Windows could not detect this network’s proxy settings resolved or not.
Ways-3: Apply System Restore
If you make any changes to your system, either installed any third party software or installed windows latest update and thereafter proxy setting error began to appear, in this case, you should apply system restore. System restore will bring you back where your system is in good condition and out of any error. To use system restore error, follow these steps: –
- Open Windows Setting by pressing Win + I shortcut key altogether.
- Open the system section.
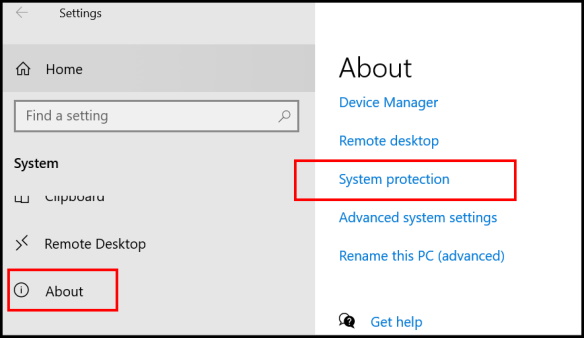
- Now from the left side of menu, click on the about option located at the bottom.
- Thereafter go to the right side of same page and choose the option System Protection.
- Now system properties window is open.
- Here select the option System protection.
- System properties window will open now.
- Choose the option System Restore.
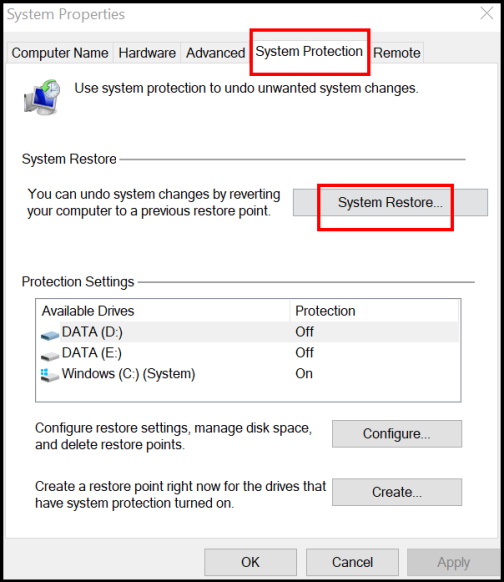
- Then click on the Next button.
- Select the restore point to revert changes.
- It will restore your computer to the state it was in before the selected event.
- You may click on scan for affected programs option.
- It will remove that program causing error.
- Follow on-screen instruction to complete the restoration process.
Ways-4: Uninstall Third Party Antivirus to Fix Windows Network Proxy Settings Error in Windows 10
Although Antivirus is must for every computer because it secures your system from external threats. We don’t recommend to uninstall third party antivirus. But these third party antiviruses having tendency to restrict some app or programs to process. Even Windows defender is also the best tool to defend the system from threats or malware. The third party antivirus installed in your system may also interrupt to Windows Network Proxy Setting and accordingly you will have to face the error in windows 10. You should uninstall it and check whether the login issue resolved or not.
To uninstall the third party antivirus installed in your system, follow these steps: –
- Open Control Panel.
- Go to the option Programs & Features.
- Find out the antivirus installed in your system.
- Make a right click on it and select the option Uninstall.
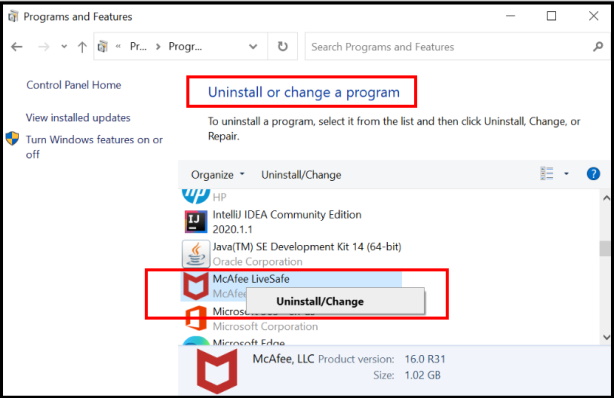
After uninstalling antivirus software check if the issue is resolved. If the issue is resolved, you must download and install different antivirus software.
Ways-5: Apply SFC / DISM Scan to check corrupted system File
Any corrupted system file may be a cause of Windows Network Proxy Setting Error in Windows 10. You should execute sfc/scannow command through command prompt window to resolve this issue.
- Go to Cortana search.
- Type cmd in it.
- Command Prompt window will appear on top result.
- Select it.
- Now go to the right side of page and choose the option Run as Administrator.
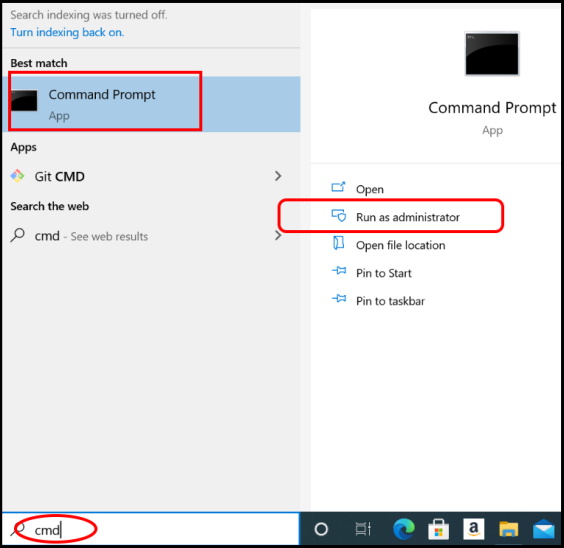
- Thereafter type the following command in Command Prompt window and press Enter key: –
- sfc /scannow
- Now it will check all the corrupted system file that causes error and repaired them accordingly.
- Follow on-screen instruction to complete the process.
Now check whether the error regarding Windows Network Proxy Setting still persist in your windows 10 system, try to DISM tool command in same window: –
- Type the following command in Command Prompt window followed by Enter key: –
- DISM /Online /Cleanup-Image /RestoreHealth
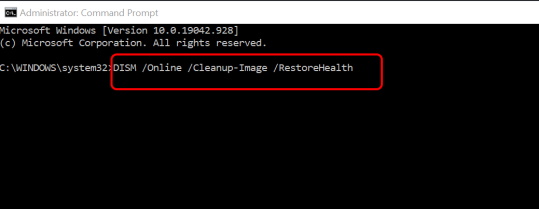
DISM scan can take about 15-20 minutes or more, so don’t stop it in mid. Once the DISM scan is finished, check if the issue is resolved.
After running both scans, your issue should be resolved.
Ways-6: Reset Internet Settings
Sometimes Windows could not detect this Windows network proxy settings error appear due to incorrect Network setting. So you must reset Network through control panel. Follow these steps: –
- Go to Cortana search in your windows 10 system.
- Type cp in it.
- Now select the Control Panel appeared as top result.
- Now choose Internet option from the available menu list.
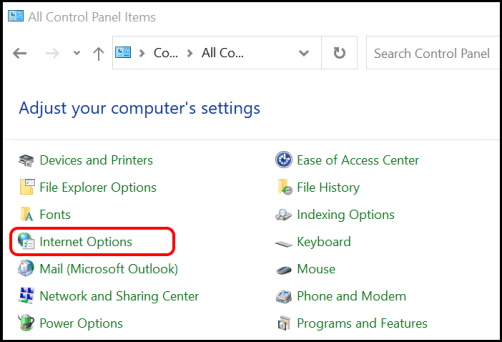
- Internet properties window will open now.
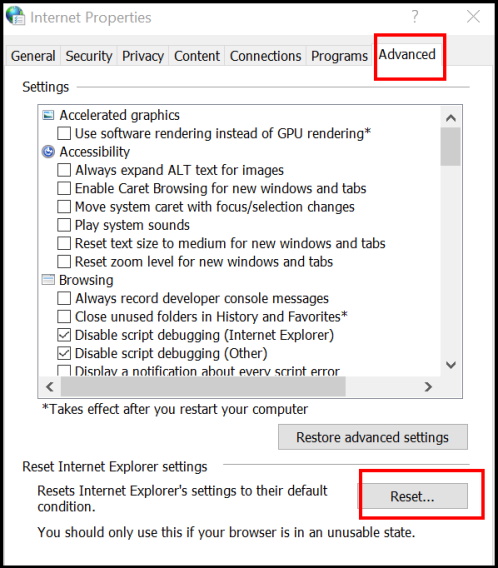
- Here go to the Advanced tab from the top menu bar.
- Thereafter click on the option Reset from the bottom of the page.
- A confirmation window will open duly asking your consent to Reset Network.
- Make a click on Reset button.
- You may check against option Delete personal settings option to reset it afresh.
- Finally click on Apply and then Ok button to save the changes.
Ways-7: Re-Enable Network Adapter to Fix Windows Network Proxy Settings Error in Windows 10
Sometimes re-enable network adaptor may resolve proxy settings error issue. You should disable it first and again enable Adapter setting in Windows 10. Follow these steps: –
- Go to Cortana search in your windows 10 system.
- Type cp in it.
- Now select the Control Panel appeared as top result.
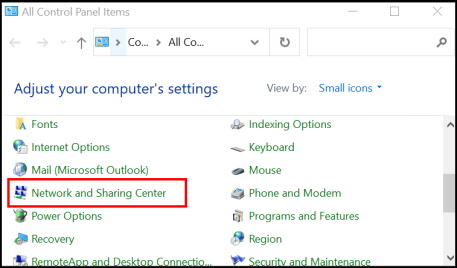
- Thereafter choose Network and Sharing Center from the available menu list.
- Now from the left side of window, choose the option Change Adapter Settings.
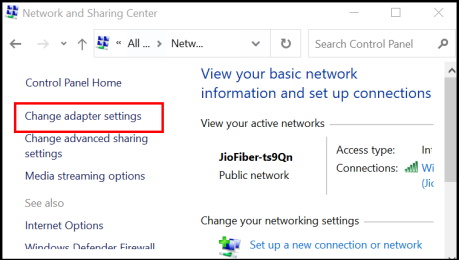
- A new network connections window will open now.
- Here apply a right click on your current network.
- Select the option Disable from the drop down menu.
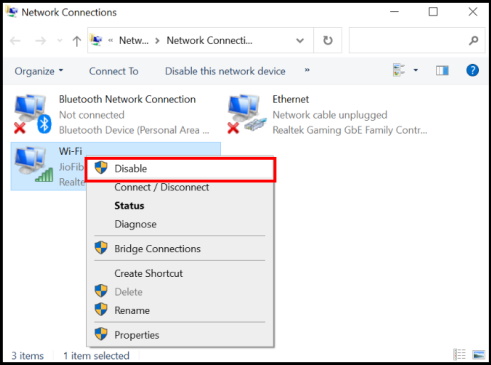
- After a while. repeat the same procedure and choose the option to Enable it.
- Check whether your issue resolved or not.
Ways-8: Change DNS server settings
- Go to Cortana search in your windows 10 system.
- Type cp in it.
- Now select the Control Panel appeared as top result.
- Thereafter choose Network and Sharing Center from the available menu list.
- From the left side of window, choose the option Change Adapter Settings.
- A new network connections window will open now.
- Here apply a right click on your current network.
- Select the option Properties from the drop down menu.
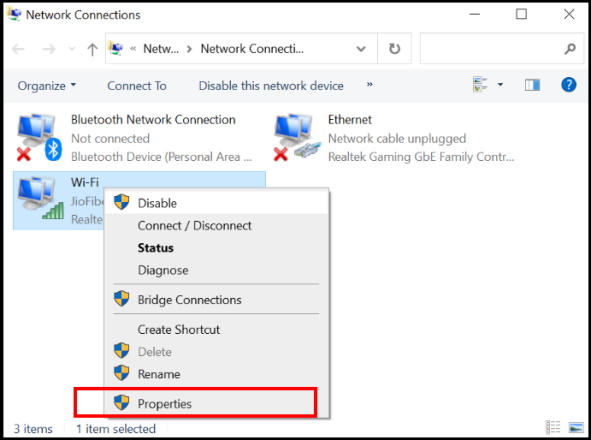
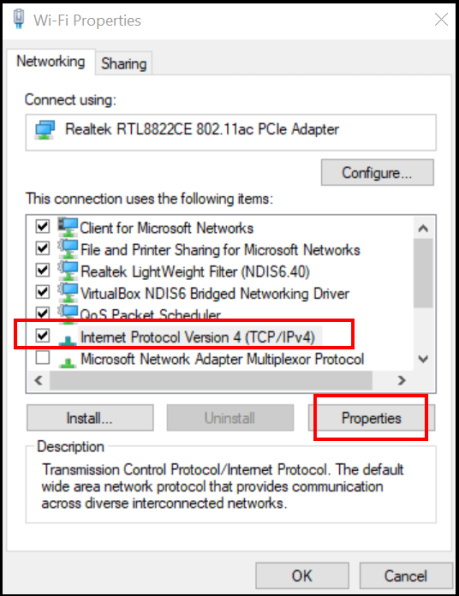
- In the properties window, go to the section “The connection uses the following items”.
- Select the option Internet Protocol Version 4 (TCP/IPv4).
- Thereafter make a click on the option Properties.
- Now under Internet Protocol Version 4 (TCP/IPv4) properties window, make a check against the box obtain an IP address automatically.
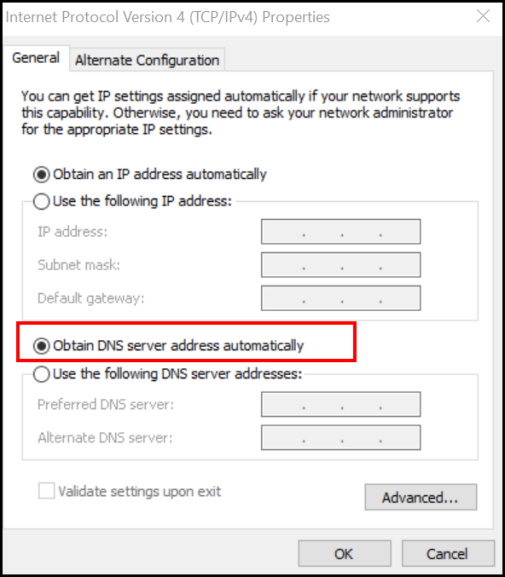
- Then click on Ok button to save the changes.
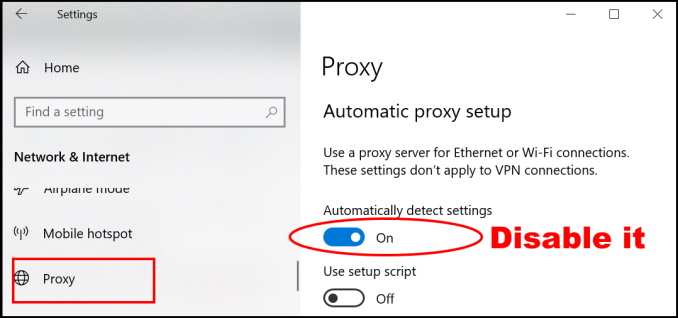
Ways-9: Disable Automatically detect settings
- Press Win + I shortcut key to open Windows settings.
- Go to the Network & Internet section.
- Now from the left side of page, select the option Proxy.
- Thereafter go to the right side of page and turn the toggle button Off against option Automatically detect settings.
Ways-10: Run Windows In-built tool Troubleshooter
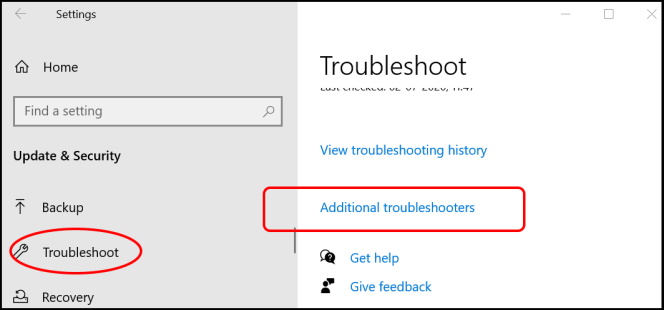
- Open Windows Settings.
- Go to the Update & Security section.
- Now from the left pane, choose the option Troubleshoot.
- Then go to the right side of the same page and click on Additional troubleshooters.
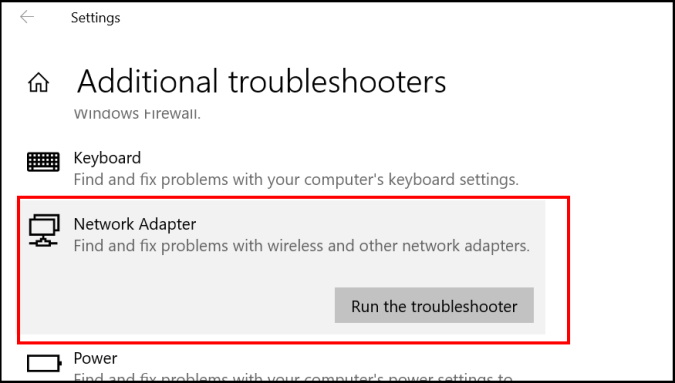
- Navigate the option Network adaptor.
- Make a click on it to expand.
- Select the option Run the Troubleshooter.
People also Look for:
- Windows 10 can’t detect proxy settings
- Windows could not automatically detect proxy server
- Network Proxy Settings not saved by Window
- Windows proxy settings keep changing
- Windows 10 proxy settings not saving, changing
That’s all.
