How to Enable Disable Write Caching on Disk in Windows 10. If you want to make your disk drive faster, write caching feature will definitely help you in optimizing windows 10 performance. Write caching feature keep some disk in your system memory for a period and after some period it is written on disk. In between it is kept on your memory and does not full your disk. Accordingly your disk operation optimize and function better. But one shortcoming of disk write caching also come to notice. If due to any reason such as power failure, hardware failure, your data may be lost from Memory before writing on disk.
Although write caching feature in windows 10 is in enable mode for Internal storage disk, however for external disk, you have to enable it manually.
How to Enable Write Caching on Disk in Windows 10
In most of the Windows 10 system, write caching feature is in enable mode by default. But if you not find it, here is the process of Enable Write caching in Windows 10: –
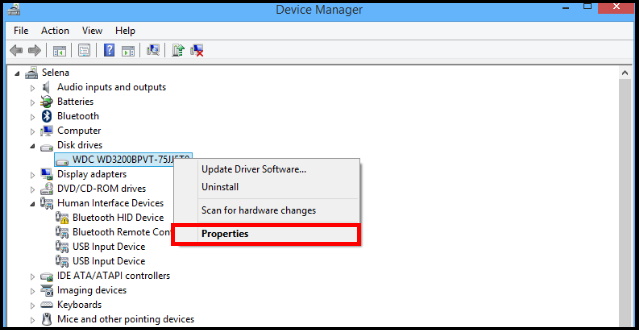
- Open Device Manager in your Windows 10 system.
- From the menu list, navigate the option Disk drives.
- Make a click on it to expand.
- Apply a right-click on the Disk drive on which you want to enable write caching feature.
- Select the option Properties from the drop down menu.

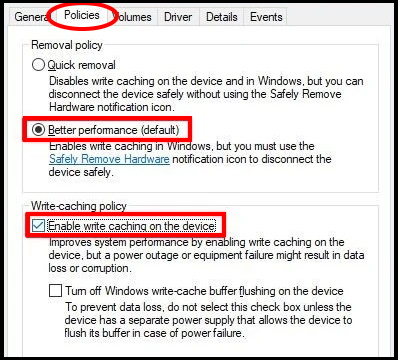
- Now your selected disk drives Properties window will open.
- Here, you will find two options. The first one is Removal policy and the second one is Write caching policy.
- Make the check against the option Better performance (default) under Removal policy.
- Now go to the Write caching policy section.
- Make the check against Enable write caching on the device.

- Click on the OK button.
- Restart your system.
Now write caching option is enable in your device. Writing command will be stored in your memory. You should ensure extra power supply to your system. Because before writing on disk it maybe lost from the memory.
Before ejecting the external drives from your windows 10 system, you must go through the option safely remove hardware.
How to Disable Disk Write Caching in Windows 10
You should apply the same procedure with few changes to disable Write caching on Disk in Windows 10. Follow these steps: –
- Go to the Start.
- Type Device Manager for search.
- Apply double click on the top result as Device Manger to open it.
- Go to the disk drives section.
- Expand it.
- Choose your disk that you want to disable.
- Make a right click on it and choose the Properties option.
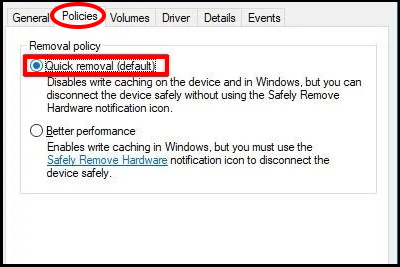
- Thereafter go to the Policies tab from the top menu bar.
- Make the check against option Quick removal under Removal policy section.

- At the end, click on the OK button.
Hopefully you will be well conversant of Enable Disable Write Caching on Disk in Windows 10.
That’s all.
