How to Allow and Restrict App through Windows Defender in Windows 10. Windows defender firewall is an in-built security feature of windows system through which you can prevent external threats to your computer from Internet or a network. Allow app through windows defender means, all your applications installed in your system or to be installed will open or operate by scanning through windows defender firewall in windows system. It is called creating an exception. If your application is allowed through Windows defender firewall, your computer is secure from any malware routed through these application. In this article, we will discuss about How to Allow and Restrict Application through Windows Defender in Windows 10. Be continue with this article.
How to Scan with Microsoft Safety Scanner in Windows 10
How to Allow and Restrict App through Windows Defender in Windows 10
Generally this feature is automatically handled or operated by Windows defender, but sometimes, users change this setting. They impose restriction of any app routed through Windows defender in windows 10. But sometimes they want or need to create an exception manually to allow an app to routed through the firewall. We will see how to allow as well as stop App through Windows defender in windows 10.
How to Allow App Through Windows Security Alert
Whenever, you installed or try to access any app over network, Windows security alert prompt for your permission. You will have to select allow access to this app through windows defender. If you want to grant permission you should click on allow access option. This is the first and initial process, you will see on each access of any app.
Through Control Panel
You may allow or restrict app routed through Windows defender firewall in windows 10. Follow these steps to complete the procedure: –
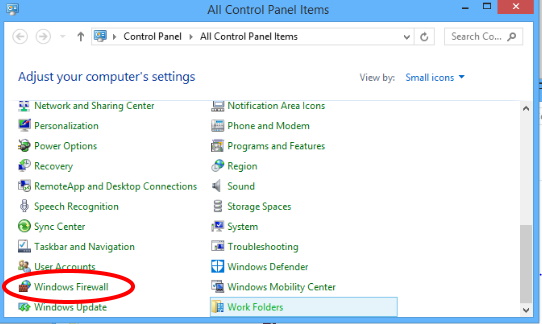
- Open Control Panel.
- Navigate Windows defender and click on it to open.

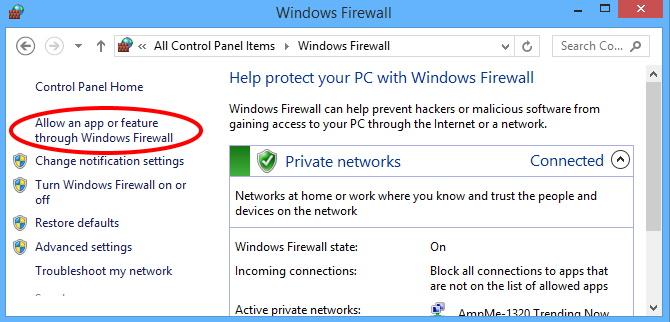
- From the left pane of windows defender, make a click on Allow an app or feature through windows firewall option.

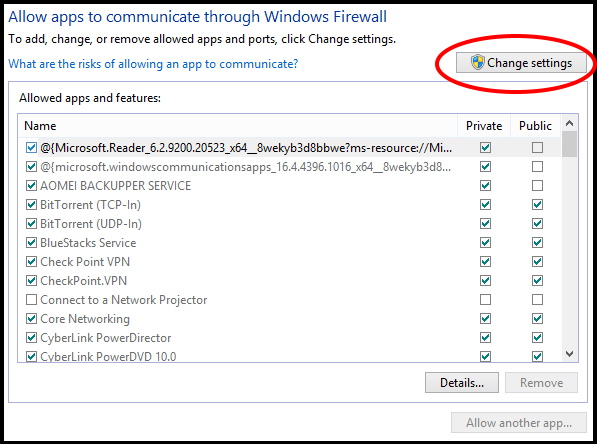
- A new page namely Allow apps to communicate through Windows Firewall will open.
- Here, you will see a list of allowed apps and features.
- If your application which you want to allow or restrict is not displaying in the list, go to the option change setting.

- Click on the Allow another app button from bottom of the page.
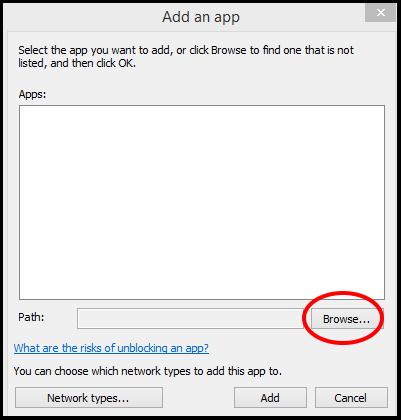
- Then click on the Browse button.

- Select the application which you want to allow app through Windows defender.
- Click on open button.
- Make a click on the Network types button.
- Mark the check box with tick against the network locations. Select Public or Private.
- Click on OK button.
- Now click on the Add button.
- Make a click on OK.
How to Restrict Applications through Windows Defender in Windows 10
- Again open Control Panel.
- Select Windows Firewall.
- Now click on the Allow an app or feature through Windows Firewall option from the left pane of windows firewall page.
- Make a click on Change Setting option.
- Now select the application which you want to restrict or remove to routed through windows defender in windows 10.
- Make a click on the Remove button.
- Click on Yes button to confirm.
- The application will no longer available to routed through Windows defender.
- Click on the OK button.
That’s all.

2 thoughts on “Tips: Allow and Restrict App through Windows Defender in Windows 10”