How to Enable / Disable Superfetch / SysMain Windows 10. If you want to load any app faster than as usual, you must enable superfetch in your windows 10 system. Then Superfetch in windows 10 helps you to load any app very faster. The another benefit of superfetch is about decreasing boot time, i.e it makes fast your startup process. Now one question arises that how it works? Superfetch acts this process by preloading them in the memory as well as help in tracking your usage pattern so that you could get better preloading decision. You may understand by this example. Suppose you launch chrome in the morning, it will preload chrome in the morning hours, so that app load faster.
Why should be kept it as disable mode. Because it covers a lot of space and high disk usage. Here in this article, we will discuss both its enable / disable superfetch / sysmain in windows 10.
Important Point – In new Windows 10 Latest Update, Windows OS have renamed it as SysMain.
How to Disable Superfetch / SysMain Windows 10 By Service Manager
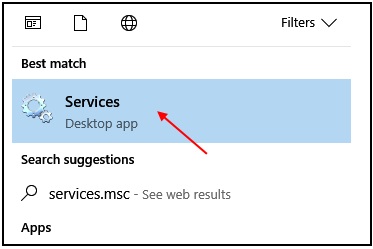
1. Type Services in the Taskbar Search
2. Now, Choose Services.

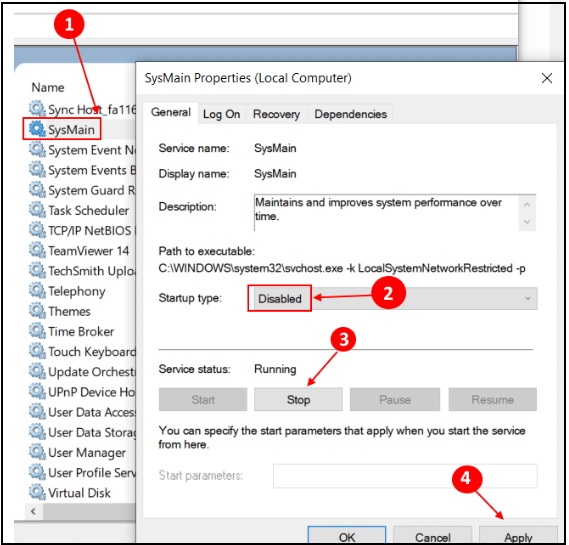
3. Find Sysmain.
4. Double click on Sysmain.
5. Now, Choose Startup Type as Disabled from the dropdown.
6. Click on Stop to stop the service.
7. Choose Apply.

How to Disable superfetch / Sysmain Windows 10 by using command prompt
- Launch Run Command.
- Type cmd in it and press Enter.
- Now Make a right click on the Command Prompt.
- Select Run as Administrator.
- Thereafter type the following command followed by Enter key: –
- sc stop “SysMain” & sc config “SysMain” start=disabled
- If you want to enable it again, just run below command.
- sc config “SysMain” start=auto & sc start “SysMain”
How to Disable superfetch By Windows Registry
Step#1 – Press Windows key + R conjointly to open Run command box.
Step#2 – Type Regedit in the run command box and press enter.
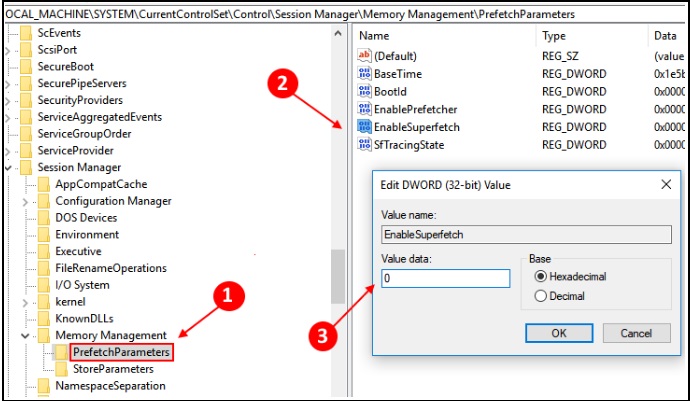
Step#3 – Now navigate the following path in the Registry window: –
HKEY_LOCAL_MACHINE > SYSTEM > CurrentControlSet > Control > Session Manager > Memory Management > PrefetchParameters
Step 4 – Now go to the right side of the popped up box, here you should navigate the option EnableSuperfetch from the available list.
Put one of the following values in EnableSuperfetch depending upon your requirement.
0 – to disable Superfetch completely
1 – to enable prefetching when program is launched
2 – to enable boot prefetching
3 – to enable prefetching of everything

If this entry is not available, just make a right-click the on the PrefetchParameters folder, then choose New > DWORD Value. Name this Enable Superfetch and do the steps given above.
Some shortcomings of Superfetch / Sysmain Windows 10
- Superfetch / Sysmain Windows 10 service always using your CPU / RAM, because it is running in background.
- Once you use superfetch to loading any app very faster, Superfetch doesn’t eliminate the need to load apps into RAM. Whenever that loading happens, your system still experiences the same slowdown as if you were launching the app without Superfetch.
- System startup can be sluggish because Superfetch is preloading a bunch of data from your HDD to RAM. If your HDD runs at 100% for a few minutes every time you start or restart your computer, It may be due to superfetch.
Thnx….
