How to Fix 100% Disk Usage in Task Manager of Windows 10. Sometimes users reportedly claim that their Task manager showing 100% of disk usages. it means your one of hard drive became overload and as a result your computer may be slow than usually. In this topic we will discuss about it common fixes step by step through 9 gentle way.
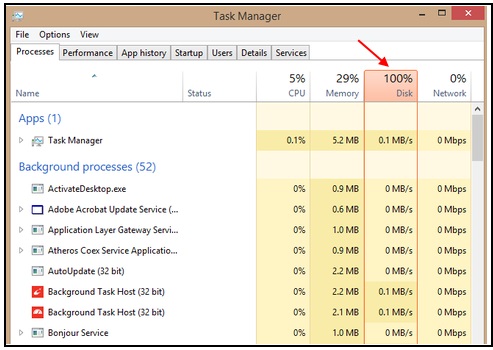
How to Fix 100% Disk Usage in Task Manager of Windows 10
The following are the main tips to fix or resolve this issue: –
- Through Notification & Action in windows 10
- Disk checking through Command Prompt
- Turn Off Windows search services
- Turn Off windows 10 Automatic Update
- Disable Superfetch in windows 10
- High Performance Power Plan Required
- Disable Chrome Prediction Service
- Close Background Running Apps
- Disable Diagnostic Tracking in Windows 10
Through Notification & Action in windows 10
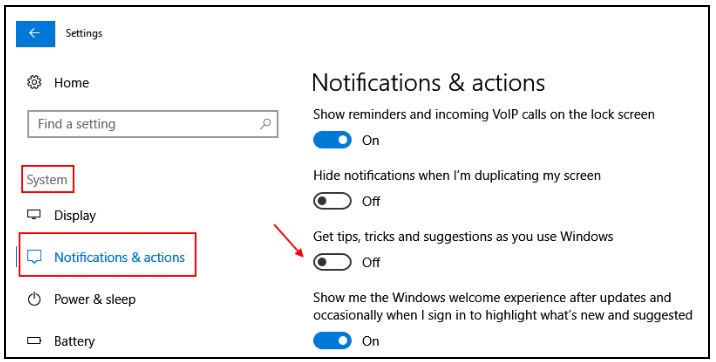
Notification received from various sources may be a reason of 100% disk usages in Task Manager. You should turn off this function by following the steps below: –
Step1 – Open Setting by Pressing Windows key + I conjointly in windows 10.
Step2 – Now, Go to system -> Notifications & Actions
Step3 – Scroll down and toggle off the option “get tips, tricks and suggestions as you use windows”.
Disk checking through Command Prompt
Infected hard disk may be a cause of 100% disk usages in windows 10. You should repair hard disk by using CHKDSK utility in Command Tool. The guidelines are as follows –
- Open the Taskbar Search on screen by pressing Win+S hotkeys conjointly.
- Type cmd and as soon as the Command Prompt appears.
- Make a right click on it.
- Select Run As Administrator option and also choose Yes once UAC prompts for permission.
- In the Black window, type the following command –
chkdsk [Drive:] [parameters]
- With this command, you will see the disk status only but as you need to fix the bad areas in it, the command would be having the following parameters –
/f /r /x
Abbreviate –
f – Fixing the error found in the volume.
r – Detects the bad areas in the volume and retrieve the readable data from volume.
x – Instructs the whole volume to dismount before the system starts.
- Therefore, the full command stands as chkdsk [Drive:] [parameters]. With all the initiations present in it –
chkdsk C: /f /r /x
Note- we have used C: as the drive where Windows is installed. You can use different based on where you have stored the Operating System.
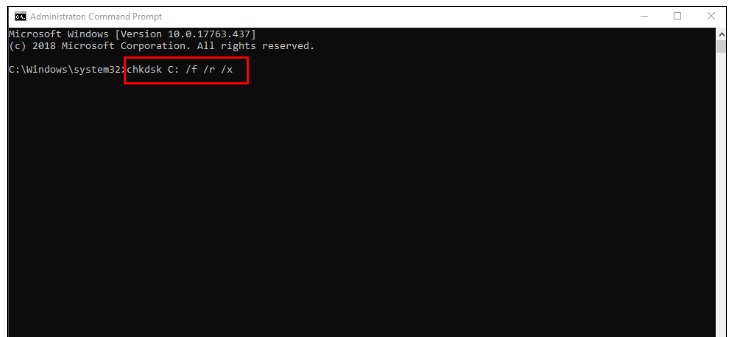
This command prompt action will help to fix and found any errors on your disk as well as it locates for bad sectors and recover any readable information.
Turn Off Windows search services to Fix 100% Disk Usage
If Windows search service is enable in your system, then it may be a cause of 100% disk usages in Task Manager of Windows 10. You should first disable it temporarily then after found it responsible then disable it permanently.
Step 1 – Open command prompt as administrator.
Step 2 – Now, run the command given below to disable search services temporarily.
net.exe stop "Windows search"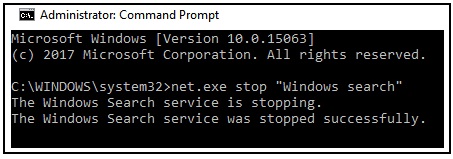
Now, Open the task manager again and check the disk usage. If it comes down, then you assume it the reason of 100% disk usages in Task Manager. So you should disable it Permanently.
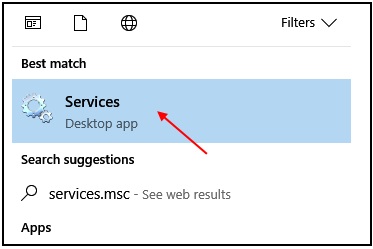
Step.1 – Search services.msc in the search box.
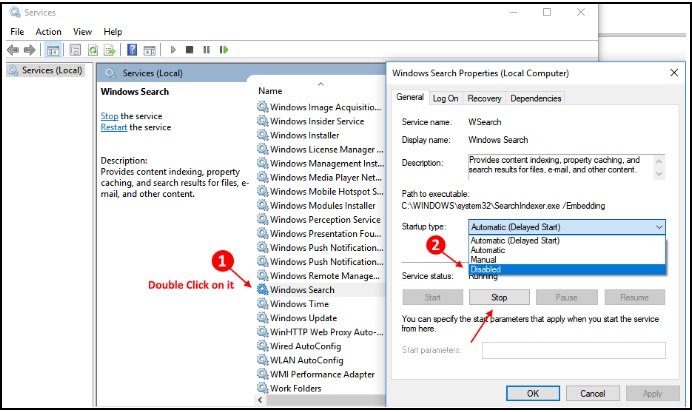
Step.2 – Now, find Windows Search option from the list.
Step.4 – Apply a double click on it. Choose startup type as disabled from the dropdown menu.
Step.5 – Click on stop. Finally, press OK.
Turn Off windows 10 Automatic Update to Fix 100% Disk Usage
Windows 10 automatic updates may be a reason for 100% disk usages in Task Manager of Windows 10. You should Disable windows update. Although it is easy to disable windows 10 update, but you can do that through the service manager. Here is how to do so.
Step#1 – Search services.msc in the taskbar search box.
Step#2 – Click on services to open the service manager window.
Step#3 – Now, find the entry known as, windows update. Double click on it.
Step#4 – Now, choose startup type as disabled from the dropdown.
Also Read: How To Disable or Turn Off Windows 10 Automatic Updates
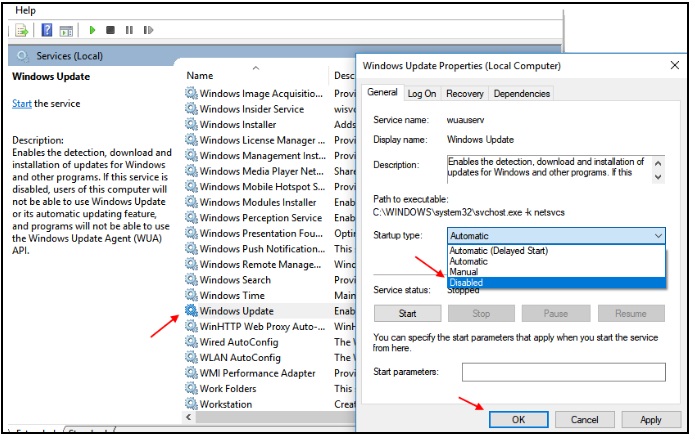
Wait, the update has not been disabled yet fully. You have to disable background intelligent transfer service also.
Step#5 – Choose background intelligent transfer service from the list.
Step#6 – Choose startup type as disabled and hit OK.
Step#7 – Now, reboot your PC.
Disable Superfetch in windows 10 to Fix 100% Disk Usage
Do you know about Superfetch? If you want to load an App very fastly, then use Superfetch. Superfetch is a function by which you can load a program through RAM faster than other. But one problem with it is excessive use of memory. It covers a lot of memory in background so that you will face 100% disk usages in Taskbar of Windows 10. Disabling superfetch lowers the disk usage to a large extent in windows 10.
To disable superfetch in Windows 10 follow the steps given below.
Step 1 – Open command prompt as admin.
Step 2 – Execute the following command in Command prompt.
net.exe stop superfetch

High Performance Power Plan Required
Sometimes low power plan may be a cause of 100% disk usages in taskbar of Windows 10. So you should change your power plan from low to high.
- Open power options
- Change it with high performance
- make sure plan settings are on default.
Disable Chrome Prediction Service to Fix 100% Disk Usage
Chrome Prediction Service already turned On by default in Chrome browser. If you are using chrome on windows 10 System, you should turn this setting off to lower disk usage as it keeps writing to the disk to load pages more quickly. Follow the under mentioned steps to disable chrome prediction service: –
Step 1 – Make a click on three vertical dots on top right location of Chrome.
Step 2 -Now, click on settings. Then click on Advanced.
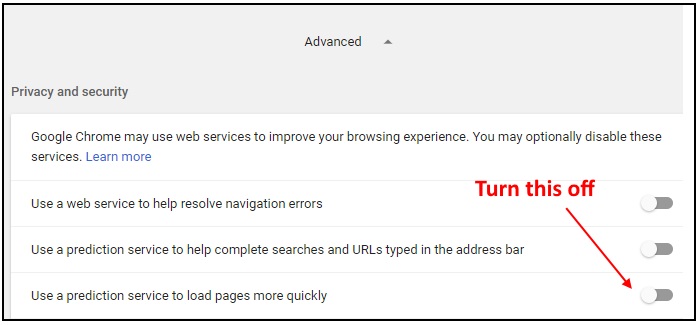
Step 3 – Now, scroll down to the privacy section. Now, turn off the option saying “Use a prediction service to load pages more quickly”.
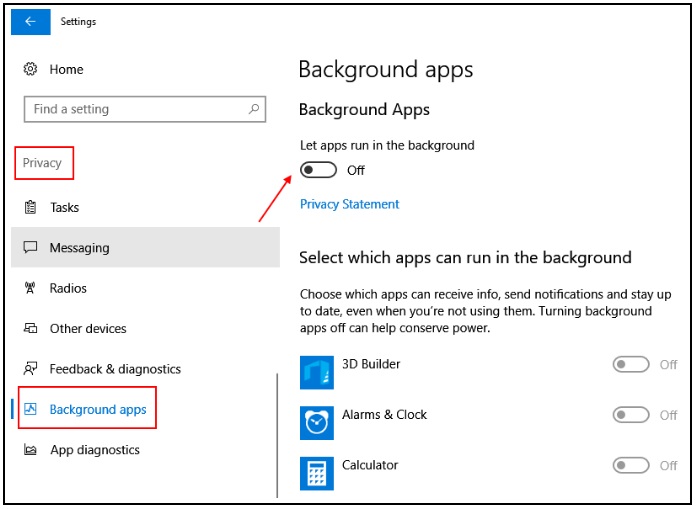
Close Background Running Apps
Step1 – Open Settings by pressing Windows key + I conjointly.
Step2 – Now, click on privacy.
Step3 – Now, click on Background apps from the left menu.
Step4 – Now, in the right side, just turn off, “let apps run in the background option”.
Disable Diagnostic Tracking in Windows 10
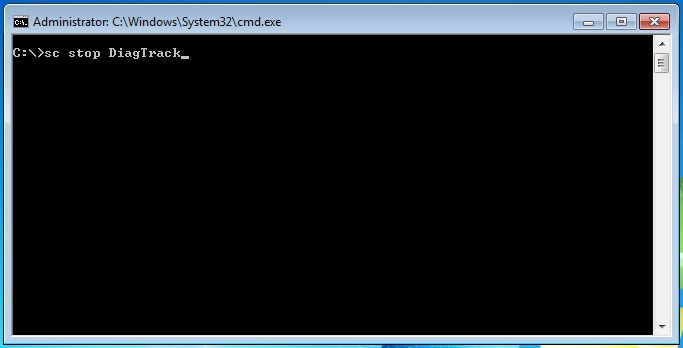
Diagnostic Tracking in Windows 10 covers a lot of disk space and may be a cause of 100% disk usages in Taskbar in windows 10. You must disable it to get rid of 100% disk usages in windows 10. Please follow the steps given below to disable diagnostic tracking in windows 10.
Step 1 – Open command prompt as admin.
Step 2 – Run the following commands in command prompt.
sc config “DiagTrack” start= disabled sc stop “DiagTrack”
 That’s all.
