Activate Hibernate in Start option in Windows 10 / 8. Normally, there are three options Sleep, Shut down and Restart available under power button in Windows 10 / 8. Sleep mode is used when you want to temporarily away from computer. Also you assume it as standby mode. An another feature named Hibernate works in the similar way but having improved feature from Sleep mode. It stores your open documents and running applications on your hard drive and shuts down your computer. In a Hibernate mode, your computer uses minimal electrical power and stores your important running task, if you’re leaving the PC for a while and you want to continue where you left off when you get back. Before starting to activation procedure of Hibernate, we will discuss about how it differs from Sleep mode.
What is Sleep Mode ?
When you leave your system for a short while, the running work or playing movie or game become pause and stored in system memory. In sleep mode your system will not consume any power supply. All active work on the computer are paused and any open documents and applications are put in memory while the computer goes into a low-power state. It means, Sleep mode is basically the same thing as “Standby” mode. Sleep mode is helpful in stop working for a short period of time. The computer doesn’t use much power in Sleep mode, but it does use some.
What Is Hibernate Mode ?
Hibernate mode is same as sleep, but one difference is that all your your open documents and running applications saved in your Hard disk whereas in sleep mode, saved in your system memory. This allows your computer to turn off entirely, which means once your computer is in Hibernate mode, it uses less power. Once the computer is powered back on, it will resume everything where you left off. It just takes a bit longer to resume than sleep mode does.
How to Activate Hibernate in Start option in Windows 10
Here are the procedure to activate Hibernate in power button in Windows 10. Follow these steps: –
- Open Control Panel.
- Go to the Hardware and Sound option.
- Then proceed to the Power option.
- Now click on choose what the power buttons do option from the left pane of system setting.
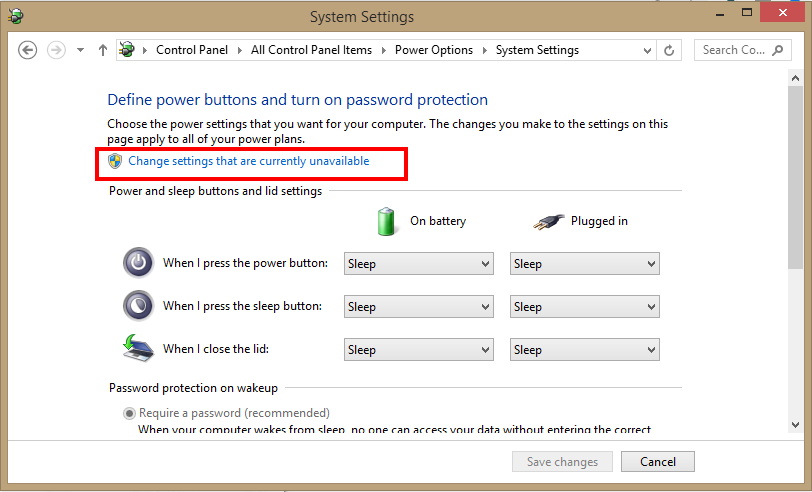
- Next click on the Change Settings that are currently unavailable link which are available just below the option Define Power button and Turn on password protection option.
- This will permit you to change shutdown options.
- Under shutdown setting, there are four options are available. These are : –
- Turn on fast startup (Recommended)
- Sleep
- Hibernate
- Lock
- Here, you should mark check box under Hibernate option.
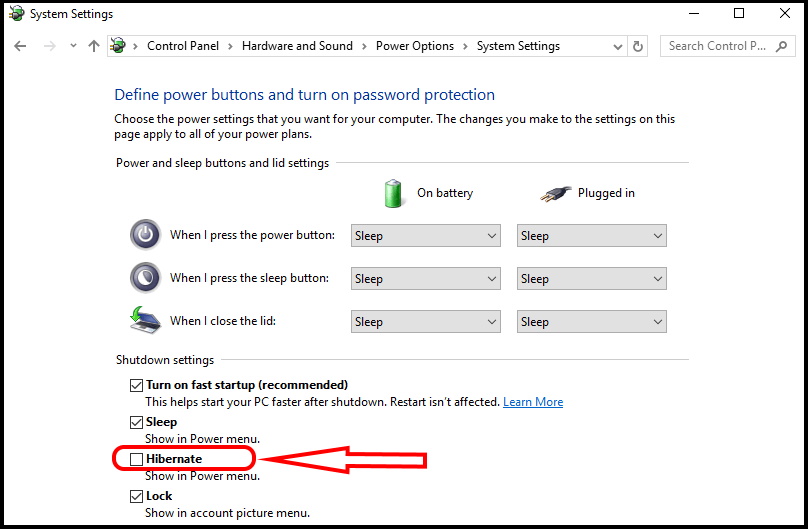
- At last click on Save changes.
How to Activate Hibernate in Start option in Windows 8
Now we will see how to activate Hibernate in start option in Windows 8. There are two methods to activate Hibernate in Windows 8.
Activate Hibernate in Windows 8 through Dos Command
- Open Run dialog box.
- Type “cmd” into the box.
- Then press Ctrl+Shift+Enter to run the command as an administrator.
- To activate Hibernate option in the power or start button then type the following command after blinking cursor in prompt window – Powercfg /h ON
- Now, Close the Command Prompt windows and now you will find Hibernate menu in Power button.
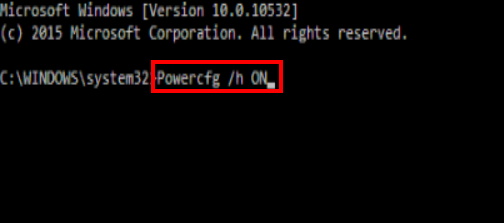
Activate Hibernate in Windows 8 through Control Panel
- Open Control panel.
- Go to the Power Options menu and click on it.
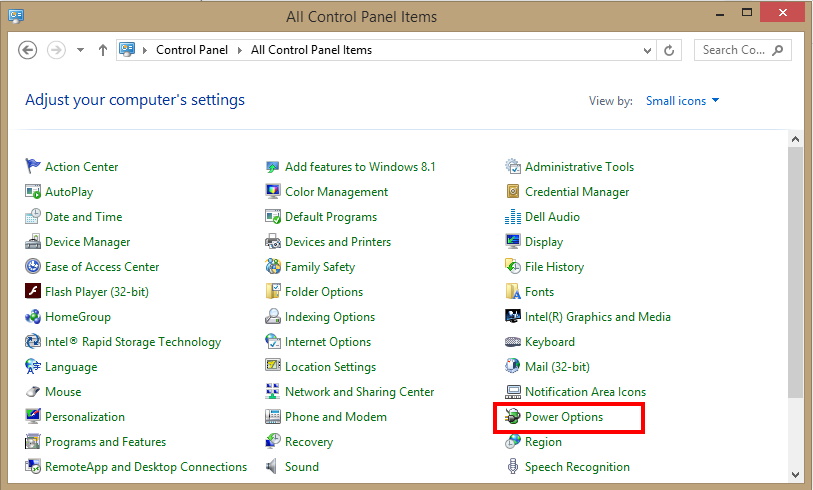
- In Power Options window, Click on the link Choose What the Power Buttons do located in third row of left panel.
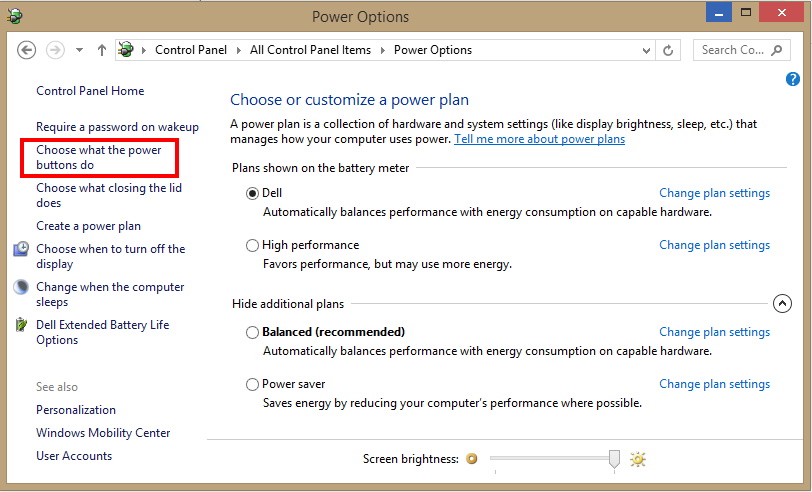
- A new window of System settings will appear on your screen.
- Click on the option Change Settings that are currently unavailable as shown in screenshot.
- A new window will display on your screen.
- Locate Power Options Settings tab here.
- Under shutdown setting, Hibernate option is available.
- Make a check on the box Show Hibernate.
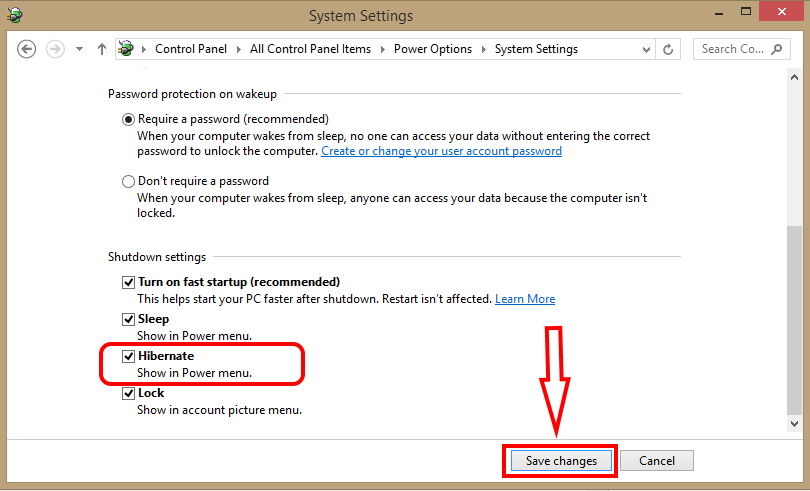
- At last click on Save Changes button at the bottom.
Now Hibernate option will enable and appear in the Power button.
How to Manage Automatically Sleep or Hibernate in Windows 10 / 8
Sometimes, it happens that, after a certain time, your system automatically goes under sleep mode or hibernate mode and your work is hampered. If you are using any battery operated system, then chances increase to turn off your system in mid of your task and may be loose your important data. In this case, you must remember how to manage hibernate or sleep option manually. Here is the methods to prevent such happening and manage manually the hibernate or sleep option: –
- Open Control Panel.
- Go to the Hardware and Sound option.
- Then proceed to the Power option.
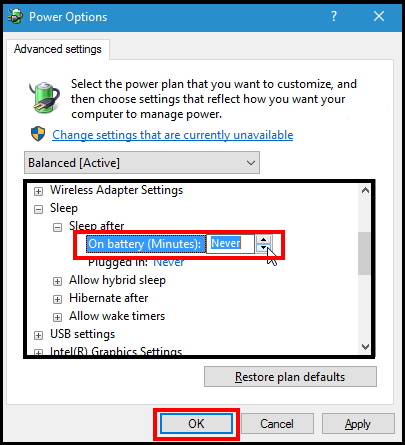
- Go the sleep option.
- Make a double-click on the “Sleep” option.
- Again apply double click on “Sleep After”option.
- If you’re using a laptop, click “On Battery” or “Plugged In” to activate the edit box.
- Click the down arrow until “Never” is selected.
- If you’re using a desktop computer, click Setting, and click the down arrow until “Never” is selected.
- You may apply the same procedure for the “Hibernate After” heading.
The same operation may be furnished for displaying option.
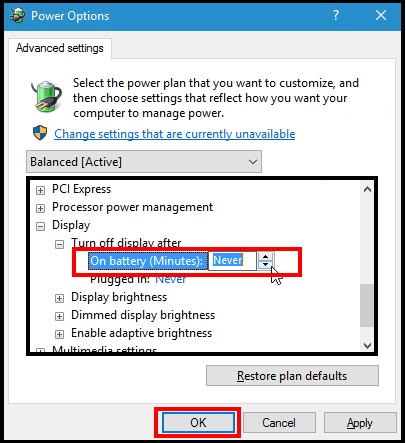
- Make double-click on the “Display” option.
- Again double-click on “Turn Off Display After” and change the “On Battery” and “Plugged In”
- Set the value to “Never”. You may specify different number under value as per your requirement.
- Click OK to save your changes.
- Close the entire window.
Hopefully, you will well understood about hibernate as well as difference between “Sleep mode” and “Hibernate mode”.
That’s all.
