Resolve Mail App not Syncing Error in windows 10. Users have to occasionally face a issue that their mail app not syncing in windows 10. The main disadvantage of not syncing mail app is new messages will not appear in the action center as well as notification pane. If mail app syncs well, mail conversation view is easy to read or reply. Here in this article, we will discuss about how to fix mail app not syncing in windows 10.
Also Read: How to Resolve Mail App not Working Properly in Windows 10
Initial Workaround
Before further proceeding to its solution in brief, You must go through these initial workarounds. There is a possibility to resolve your issue regarding mail app not syncing in windows 10 through these initial workarounds.
Use Administrative Account for Login into Mail App
You must login mail app through administrative account. Follow these steps to login with administrative account: –
- Open Control Panel.
- Navigate User Account and click on it.
- Here, go through the name with administrative account.
- Now open Run Dialog Box.
- Type cmd under typing field.
- Command prompt (admin) will open.
- A UAC dialog will pop up on your screen for confirmation.
- Click on Yes button.
- Now copy the following command and paste it to the black screen where cursor is blinking.
net user administrator /active:yes

Make enable Mail App
You should check whether the mail app is enable in your windows 10 system or not. If not you must enable mail app it so that syncing could function in your action centre. Follow these steps to check or apply it: –
- Open Windows Setting.
- Go to the Accounts section.
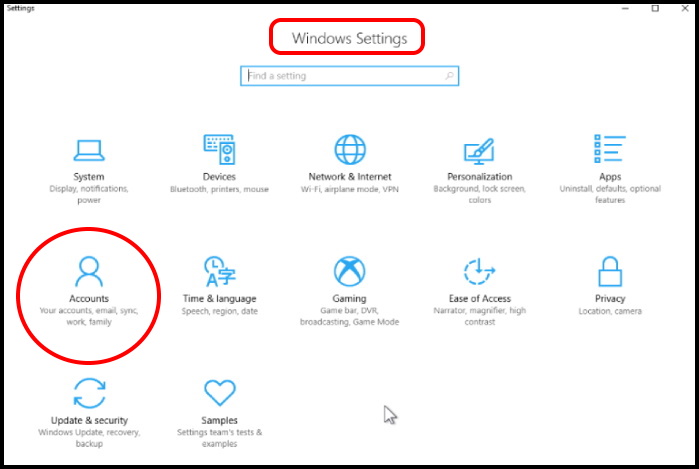
- From the left pane of setting page, click on Sync your settings located at the last option.
- Turn the toggle button ON to Enable it, if found ist disable.
Hopefully, these initial workaround will resolve your issue and mail app sync will function well.
How to Resolve Mail App not Syncing Error in windows 10
If your issue still exist even after applying initial workaround, go to the next solution as described below.
Delete your existing Email account and create again
- Go to the search option in windows 10.
- Type mail on it.
- A list of related search will appear.
- Make a click on Mail App.
- Now go to the bottom left pane of Mail app page.
- Make a click on Gear icon.
- Here select Manage Accounts.
- Delete the account which you want to remove.
- Now again create or add a new account.
- Hopefully now mail app will sync properly.
Through Mailbox Sync Setting
Make changes in your mailbox sync setting will definitely resolve your issue regarding mail app not syncing error in windows 10. You should apply this by following these steps: –
- Open Windows Setting.
- Go to the Account Section of Setting window.

- Make a click on your account to edit settings.
- Click Change Mailbox Sync Settings.
- In the Download Email from menu, choose any time.
- Click on Done button.
- At last click on Save button to make changes effective.
Check whether you are able to sync emails again. If not, go to the next solution.
Apply App Troubleshooter to resolve mail app not syncing error in Windows 10
The windows in-built feature Troubleshoot always be helpful in initial stage of any type of error. So you must try to use it to resolve your issue. Follow these steps: –
- Open Control Panel.
- Go to Troubleshoot option.
- From the left pane of window, select View all option.
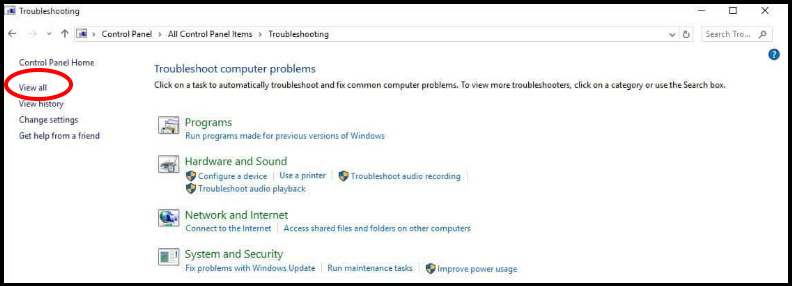
- Now go to the Windows store app.
- Select troubleshooter.
- Follow on-screen instruction.
- Let the window complete the process.
- It will automatically detect the issue and accordingly fix it if within its control.
Change Calendar Setting to enable mail app sync in windows 10
- Open Windows Setting.
- Go through the Privacy setting.
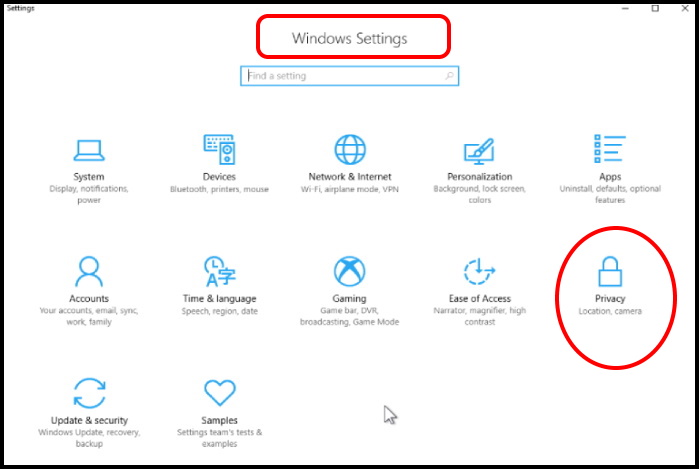
- Select Calendar on the left pane
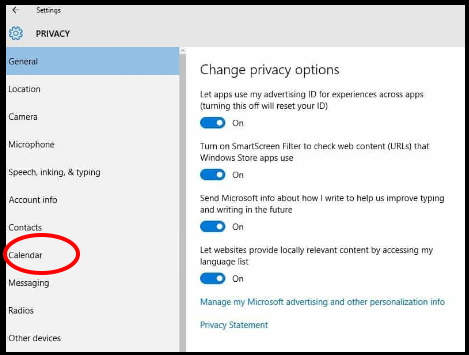
- Turn on Let apps access my Calendar
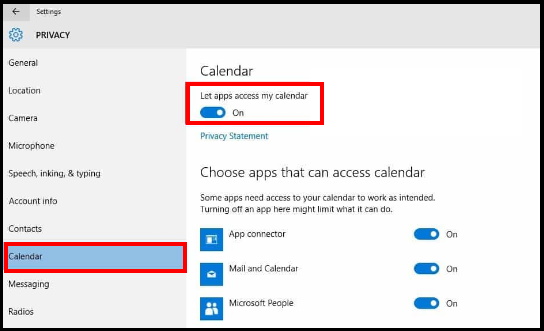
- Now select Choose apps that can access calendar.
- You should ensure that access for App Connector and Mail and Calendar are on.
Reinstall Function-on-Demand Package Manually
Function-on-Demand package is one of the component of mail which support to mail app in syncing. You should ensure that FOD package not missing from your system. It happens when you upgrade your windows build. If FOD package not exist in your system, you will unable to see your mail or mail syncing function will not work. In this case, you must reinstall FOD package manually. Here are the complete procedure to install FOD package in windows 10: –
- Open Run Dialog Box.
- In the search field box, type CMD
- Command Prompt will open.
- Make a right click on it.
- Select Run as Administrator.
- Click Yes to confirm.
- Under command prompt window, type the following command after blinking cursor: –
dism /online /Add-Capability /CapabilityName:OneCoreUAP .OneSync~~~~0.0.1.0
- Press Enter.
- The re-installation process will begin.
- Once reinstall is complete, you’ll be prompted to reboot your computer. If not, restart it yourself
- After restarting, confirm the account can sync emails in the Mail app.
Apply Windows Update Troubleshooter
Sometimes an error code 0x80072EE7 appears on your screen which shows your system is not detecting your IP address while try to update your windows system. This is mainly a windows update failed issue and accordingly affect mail app syncing in windows 10. So you should go to the Windows update troubleshooter to fix this error code as well as resolve mail app syncing issue in windows 10. Follow these steps to apply windows update troubleshooter: –
- Click on Start button.
- In the search field box, type Troubleshooting
- Click Troubleshooting
- From the left pane, click on View all.
- Here, Select Windows Update.
- Run Windows Update Troubleshooter.
- Follow on-screen instructions and let the window complete the process.
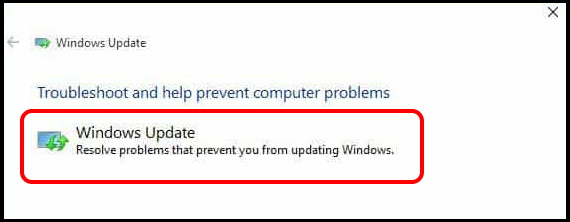
Hopefully error code 0x80072EE7 will not appear now and accordingly your mail app syncing issue will be resolved.
Disable Windows Defender Security temporarily to resolve mail app syncing error in windows 10
Sometimes Windows Defender Security which is an in-built windows security feature may also be a cause of this error. So you should try to disable it temporarily and after resolve your issue enable it so that your system could secure from any threat. Here we will describe the both procedure, i.e how to disable it and how to enable it again. Follow these steps: –
- Click on Start option.
- Go to the Windows Defender Security Center.
- Here, select Fire and network protection.
- You should choose a network profile.
- Turn off Windows Firewall for the chosen network profile.
- This procedure will be repeated for each network profile
If you find mail app syncing in function mode, must enable it through these steps: –
- Click Start.
- Open Windows Defender Security Center.
- Select Fire and network protection.
- Click Allow an app through firewall.
- Click Change Settings.
- In the list of allowed apps and features, check the box next to Mail and Calendar.
- Check the box in the Private and Public columns.
- Click Ok.
Apply above mentioned steps for each profile.
Make changes in Advance Mailbox Setting
Some changes in advance mailbox setting is definitely helpful to resolve Mail App syncing error in Windows 10. Here is how to change advance mailbox setting: –
- Click on Start button.
- Type Mail in the search field box
- Make a click on the Mail app.
- Now click the Gear icon from the bottom of the left pane
- Here, Select Manage Accounts.
- Go to the Change Mailbox sync settings option.
- Now Select Advanced mailbox settings.
- Here check and confirm that your incoming and outgoing email server addresses and ports are correct.
- Uncheck the box next to Outgoing server requires authentication.
- If your provider needs SSL for incoming mail, check the box next to Require SSL for incoming email.
- For outgoing email, check the box next to Require SSL for outgoing email.
- Confirm that your Contacts server, and Calendar server addresses are also correct.
Resolve Mail App not Syncing Error in Windows 10 through System File Checker
- Open the Run dialog Box.
- Type cmd.exe on the text field provided next to Open.
- In other hand, Press Ctrl +Shift + Enter keys conjointly to start CMD with Admin privilege.
- A UAC will prompt on your screen.
- Click Yes to proceed.
- When Command Prompt is visible in the display, Type
sfc /scannowafter the blinking cursor and press Enter. - Wait a few minutes, it will check all your system files. and if any corrupted files found, you will be informed accordingly.
Update or Download latest version of Windows 10
Microsoft releases its cumulative update on its every pathday and address various issues and its solution. It may be important for your system also to upgrade your mail app via windows update. So you must update your system with Windows latest updates regularly. At first you should check your windows latest version .
- Click on Start button.
- Select Settings option.
- Now click on System.
- Here click on About option.
- Here you will find the numbers and date near Version and Build.
- If it does not tally with recommended windows 10 latest update, you must update your system with windows latest update.
Here is the complete procedure to update your system with windows latest updates.
- Move the pointer to the bottom left corner of the screen and select Windows icon to open it.
- Perform a click on the Settings cog to launch the Windows Settings app.
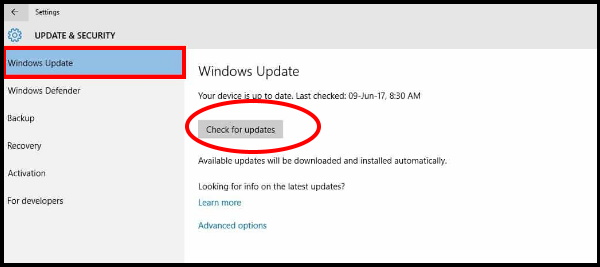
- Here, select Update & Security tile.
- After the additional Settings page display on your screen, choose Windows update option from the left pane.
- Navigate to adjacent right and hit Check for updates option if you are up to date.
That’s all.

1 thought on “Tips : Resolve Mail App not Syncing Error in windows 10”