Solution of Windows 10 Update Error Code 0x80240017. Error code 0x80240017 is also called update error because it impose restriction in installing latest windows update to the system. There are various reasons of this error which will be discussed in this article and also try to get the Solution of Windows 10 Update Error Code 0x80240017. The error code 0x80240017 in Windows 10 usually appears while you have made changes to the system by installing any third party software. It can also appear due to certain changes in the registry after a reboot and you do not have the minimum required system permissions.
What are the Solutions of Windows 10 Update Error Code 0x80240017
Here are the various ways to get solution of Windows 10 Update Error Code 0x80240017. You may apply any one of them as per your system suit: –
Solution-1: Apply WSReset.exe tool to clear or reset the Windows Store Cache
WSReset.exe is an in-built tool by which you reset or clear the Windows Store without changing the account settings or deleting existing applications. You may find this tool under C:\Windows\System32 directory on every computer either Windows 8, Windows 8.1 or Windows 10 computer. Damaged or corrupt Windows store cache may be a cause of Windows 10 Update Error Code 0x80240017. To run WSReset.exe tool in your windows 10 system, follow these steps: –
- Open RUN Dialog Box.
- Type wsreset.exe in the typing field.
- Now choose Run as administrator.
- Then a Command Prompt window will pop up to execute the command.
- Reboot your operating system and login with your administrator account.
Now definitely the Error Code 0x80240017 will not appear and you may easily update your windows 10 system. If the error still appearing, try for next solution.
Solution-2: Apply Windows In-built Troubleshooter to Fix Windows 10 Update Error Code 0x80240017
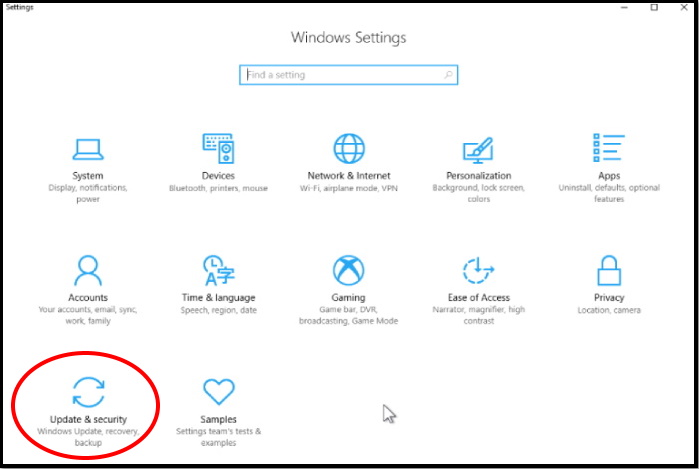
- Open Windows Setting.
- Go to the Update & Security Section.
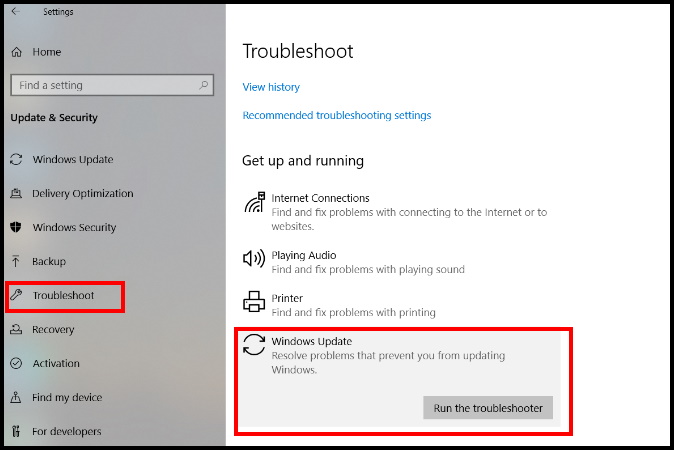
- Now from the left pane of setting page, select Troubleshoot.
- Navigate Windows Update Troubleshooter from the right side of setting page.
- Now a scanning process will start and if any defect found, it will be resolved accordingly.
- Follow the on-screen instructions to finish the troubleshooting steps.
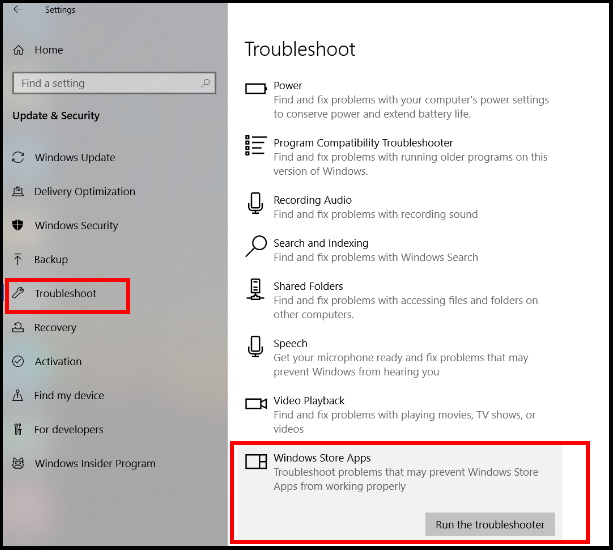
- After completion of windows update troubleshoot, Scroll down and run the Microsoft Store Apps troubleshooter.
- Don’t forget to Reboot your Windows 10 system to make the changes effective.
When the device starts, check if you still get error code 0x80240017 while trying to update your apps and programs.
Solution-3: Apply Full System Scan
If certain system files got corrupted or deleted, this may trigger update issues and error Code 0x80240017. This tool will quickly scan your system and identify missing or corrupted files which will then replace. You should apply the system file checker to get rid of this error. Here are the steps to carry out this solution: –
- Open RUN dialog Box.
- Type “cmd.exe” in the text box.
- Now press Ctrl + Shift + Enter keys together.
- Click Yes when the User Account Control prompts for permission.
- Now type the following Command after blinking cursor followed by Enter key: –
sfc/ scannow
- This command tool will check the corrupted and missing system components and will replace them shortly.
- It will also resolve the dreadful system files automatically.
- Don’t forget to restart the system.
Wait until the process completes and then restart your computer > check if this workaround solved your problem.
Solution-4: Reinstall the Windows Store App to Fix Windows 10 Update Error Code 0x80240017
Microsoft store app is also responsible for the error code 0x80240017. You should reinstall the Windows store app. There is no requirement of uninstall it. Simply we can reinstall it through Windows setting option. Follow these steps: –
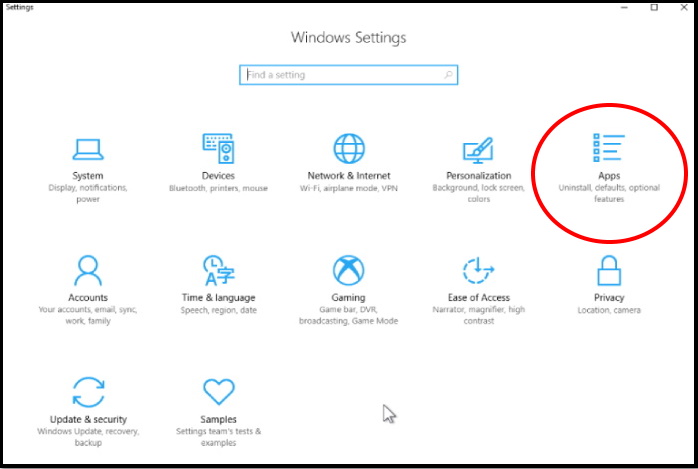
- Open Windows Setting.
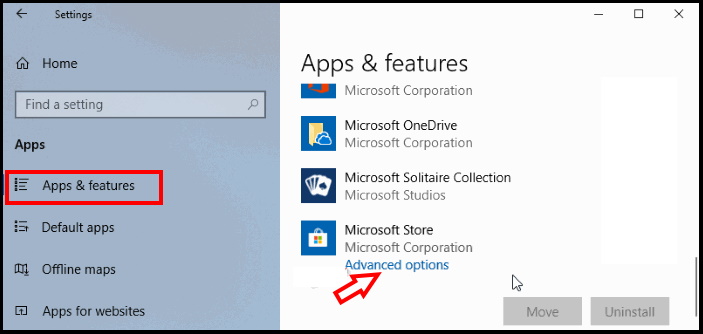
- Go to the Apps option.
- Now from the left pane of setting page, select on Apps & features option.
- Find out Microsoft store option from the right side of list.
- Make a click on the Advanced options link just located below at the Microsoft Store icon.
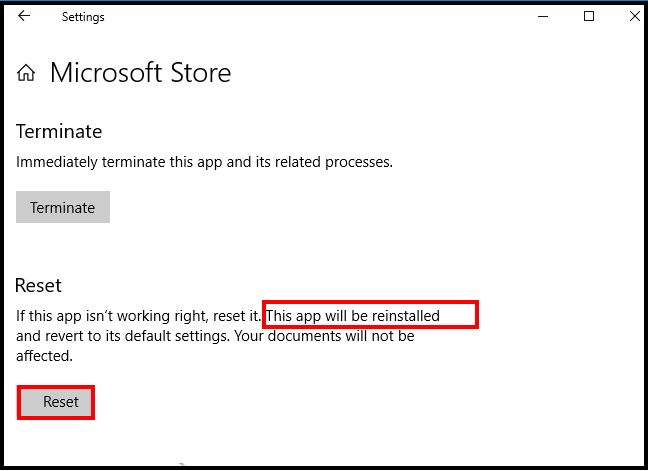
- Here, In the Reset section, click the Reset button.
- As you can see in the screenshot, the description clearly says that resetting the app will reinstall the app.
- So click on the Reset button.
- Let the window be complete the process.
- Follow on-screen instruction.
- At last you will receive a confirmation message of completion of successfully reinstallation of Microsoft Store App.
Accordingly, you will not receive the error code 0x80240017.
Solution-5: Apply Full Scan of System
Sometimes malware may be a cause of Windows 10 Update Error Code 0x80240017. So you must apply a full scan of your system, so that any virus that restrict the updating process could be removed. Follow these steps: –
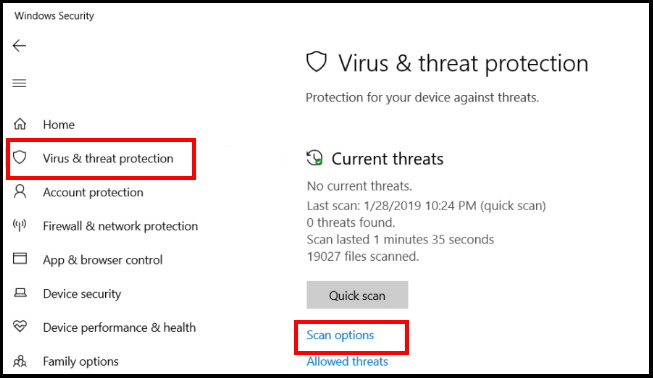
- Go to the system tray and click on Windows Security (shield) icon.
- Here, select Virus & Threat Protection.
- Make a click on Scan options from the right side of Windows security page.
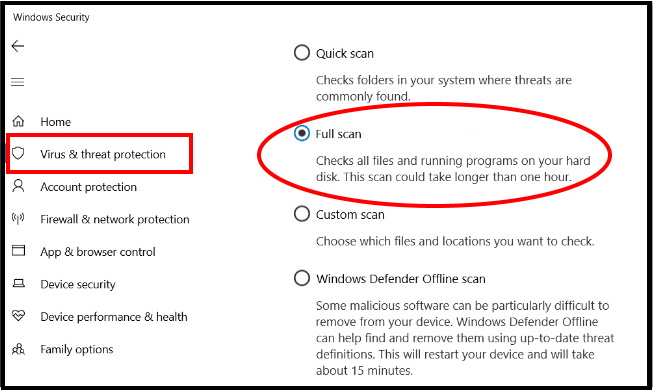
- Make a check on Full scan radio button.
- Finally click on Scan Now option.
- Windows Defender will now start detecting any threats on the system.
- Once the process completes, the scan result will appear on your screen.
- If the scan traces out any threats, click Clean threats button to get rid of them from the system.
If any malware is responsible for Windows 10 Update Error Code 0x80240017, definitely this process will resolve the issue.
Solution-6: Rename Software Distribution Folder
The Software Distribution folder in Windows operating system is a folder used to temporarily store files that may be required to install Windows Update on your computer. Sometimes its renaming resolves various type of update related issue. You must try at once. Follow these steps: –
- Open Run Dialog Box
- Type cmd on it.
- Command Prompt window will open.
- Then make a right click on it and select Run as Administrator.
- Command Prompt with administrative right will open.
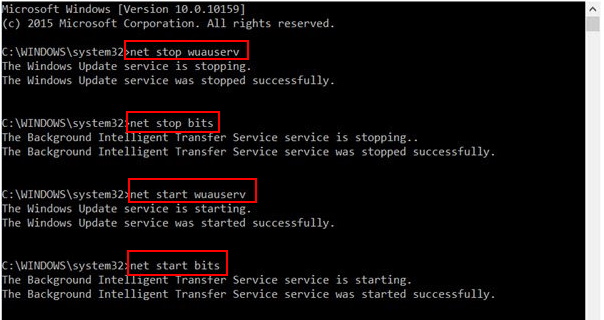
- Type the following command one by one after blinking cursor followed by Enter Key: –
net stop wuauserv net stop bits
rename c:\windows\SoftwareDistribution SoftwareDistribution.bak
net start wuauserv
net start bits
- Don’t forget to restart the system once complete the process to make the changes effective.
Solution-7: Reset your PC to Fix the Error
It should be your last option, if none of the above solution is effective. Because resetting your PC means, all your previous data may be lost. So you must create a full backup before starting this action.
Reset the PC is also a solution to fix any issue, if no any solution is fruitful. Through resetting the PC, any changes you made earlier will recover as well as the system brings back any missing driver. Here are the steps to complete the recovery process: –
- Open Windows Settings app.
- Click the tile Update & Security.
- Choose Recovery from the left sidebar.
- Move to the right column and click the button Get started located under Reset this PC.
- Follow on-screen instruction.
- After completion of process, you must restart your system.
That’s all.
