How to Enable or Disable Data Execution Prevention (DEP) in Windows 10 and Windows 11. Data Execution Prevention (DEP) is a feature available in all windows version which protect memory of windows system. This feature checks your memory and restrict various types of malicious codes to be executed by other sources. It helps in protecting windows system from external threat and save your data. Data Execution Prevention (DEP) stops malicious codes to be run and through memory pool. When a software or app tries to run malicious codes, you will receive a status code with error. Data Execution Prevention (DEP) functions well with 64x programs and users reported error while operating Data Execution Prevention (DEP) with 32x programs.
How to Enable Data Execution Prevention (DEP) in Windows 10 / 11
In this article, we will discuss how to turn on Data Execution Prevention (DEP) and How to turn off Data Execution Prevention (DEP) for a specific programs as well as completely. When this feature not shown in system settings, it will be brought back through Command Prompt windows.
To turn on or enable this feature, follow these steps: –
- Go to Windows Search.
- Here Type cmd.
- Click on Run as Administrator option.
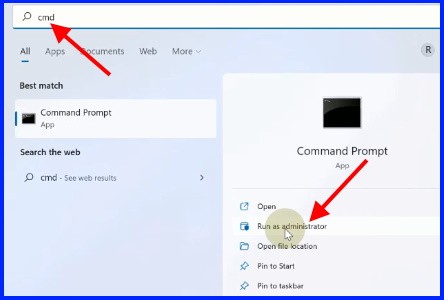
- In command prompt window, execute the following command: –
- bcdedit.exe /set {current} nx AlwaysOn

- Restart your Windows 1o / 11 system to execute the command.
How to Set Data Execution Prevention (DEP) to its default feature
- Go to Windows Search.
- Type cmd.
- Click on Run as Administrator option.
- In command prompt window, execute the following command: –
- bcdedit.exe /set {current} nx AlwaysOn

How to Turn Off Data Execution Prevention (DEP) in Windows 11 / 10
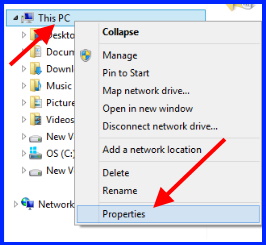
- Press Win + E shortcut key to launch Windows Explorer.
- Apply a right click on This PC option and choose Properties from the context menu.
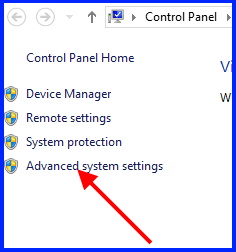
- In next window, from the left pane, choose the option Advance System settings.
- Now go to the advance tab from the top menu bar.
- Under Performance section, Click on Settings.
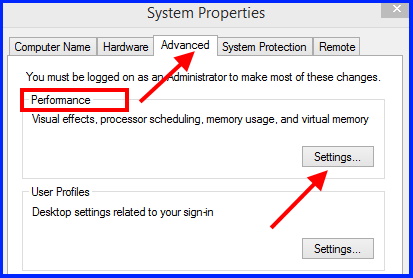
- A performance option window will open now.
- Here, from the top menu bar, click on Data Execution Prevention tab.
- Thereafter, Click on button against first option if you want to Turn on DEP for essential windows programs and services only.
- If you want to Turn on DEP for all programs and services except those I selected, choose the second option.
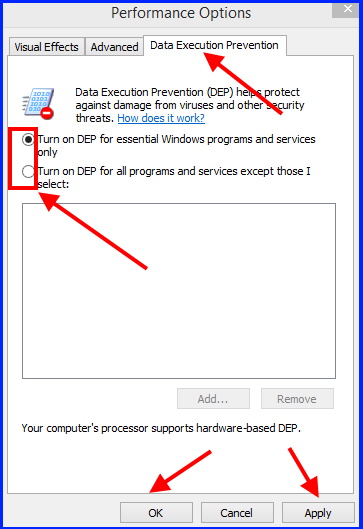
- If you choose the second option Turn on DEP for all programs and services except those I selected, The Add button automatically enabled.
- Click on Add button.
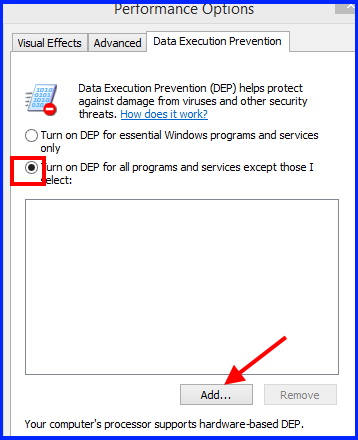
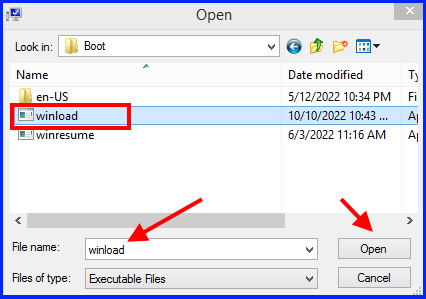
- Now Choose the desired executable file from here.
- In this case, I have selected the Boot file.
- Select it and click on open.
- This program will now out of DEP protection whereas other will remain under DEP protection.
- Finally click on Apply and then Ok button to save the changes.
- Restart your system.
You can also download this PC Repair tool to Locate and Fix any PC issue:
Step 1 – Download the Restoro PC Repair Tool
Step 2 – Click on Start Scan to find and Fix any PC issue automatically.
That’s all.
