How to Fix The system cannot move the file to a different disk in Windows 10. Users have to face various type of system errors occasionally and accordingly Windows inform you about any unwanted happening in your system through a error message. Sometimes these errors having a code, and sometimes it is in form of message. “The system cannot move the file to a different disk in Windows 10” is one of them. This error also appears with a code ERROR_NOT_SAME_DEVICE (Error 17) while you try to transfer or move a file to a different disk drive in Windows 10.

Causes of ERROR_NOT_SAME_DEVICE (Error 17)
The system cannot move the file to a different disk drive error also known as error 0x80070011 or 17 (0x11). The following are the main causes of this error: –
- Breakdown of of Hardware or software component.
- Failure of Hardware.
- Damaged or corrupted files and folders.
- Missing EXE, DLL, or SYS files.
- Outdated software versions, etc.
- Any conflict between Drivers of same nature.
- Corrupt operating system
- Wrong registry values
- Malware attacked
How to Fix The system cannot move the file to a different disk in Windows 10
Now we will see How to Fix The system cannot move the file to a different disk in Windows 10 by various methods. These are as under: –
Ways-1: Perform a full system scan to resolve the ERROR_NOT_ SAME_DEVICE (Error 17)
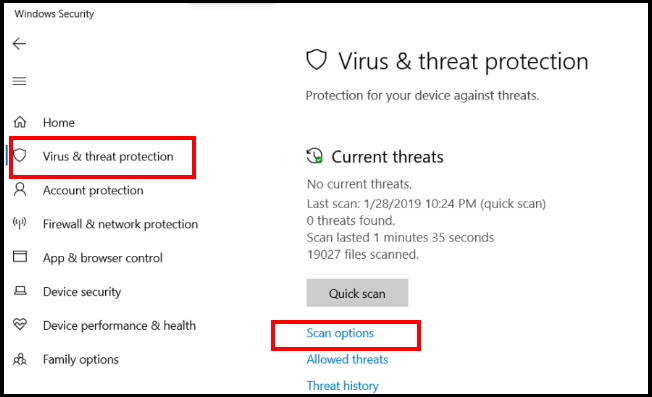
If your system infected with any spyware, ransomware and various types of online viruses such as Trojans, Error “The system cannot move the file to a different disk” appears on your screen or prevent the move of any files or folders to another disk. In this case, you must apply a full scan of your system to check or remove malwares from your system. Windows defender Firewall is an in-built tool having various aspects such as scheduled scan, quick scan, full scan, Custom scan, offline scan etc. Go through these steps: –
- Press Win + I shortcut key.
- Windows Setting App is open now.
- Here choose the option Update & Security.
- Now from the left page of setting window, click on Windows Security option.
- A new window page is open now.
- Here make a click on Scan options.

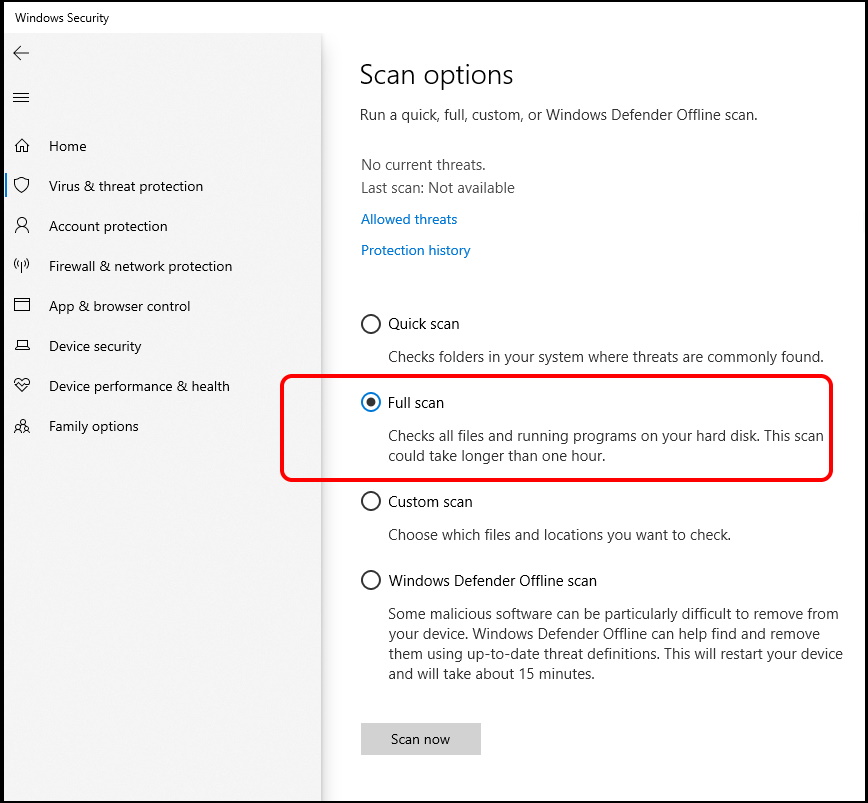
- Here, you will find four options. These are: –
- Quick scan
- Full scan
- Custom scan
- Windows Defender Offline Scan
- Select the option Full scan.

Ways-2: Perform System File Checker
Any corrupt file system may be a cause of ERROR_NOT_SAME_DEVICE (Error 17) “The system cannot move the file to a different disk” in Windows 10. You should apply sfc / scannow command to resolve the issue.
- Open Run Command by pressing Win+R shortcut key conjointly.
- Type CMD in it and press Enter.
- Command Prompt window will open now.
- Make a right-click and select Run as Administrator.
- Type sfc/scannow.
- Press Enter.

If the error persist due to corrupt Registry file, You may use CCleaner to repair it. It is a third party tool and available either free of cost or at minimal cost. You can optimize your Windows 10 performance by installing CCleaner in your system.
Ways-3: Download Windows Latest Updates and Install them
Outdated operating system may be a cause of file or folders failed to move on another disk drive in windows 10. You should check any available updates pending to install in your system. For this, follow these steps: –
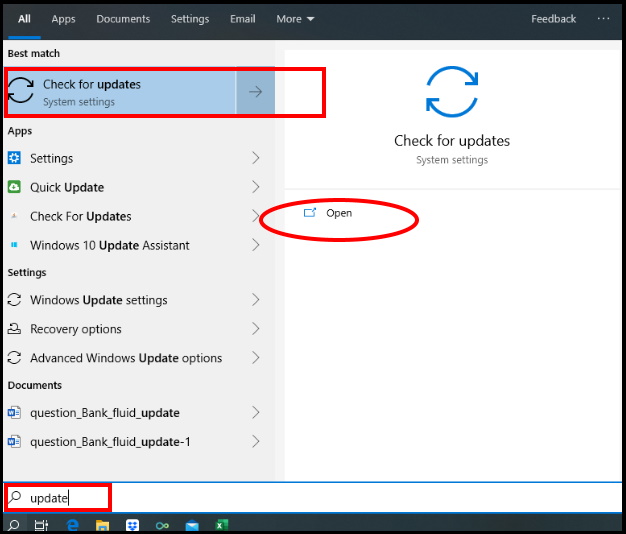
- Go to Start menu.
- Type updates.
- Now go to the top result and select Check for updates as best match.

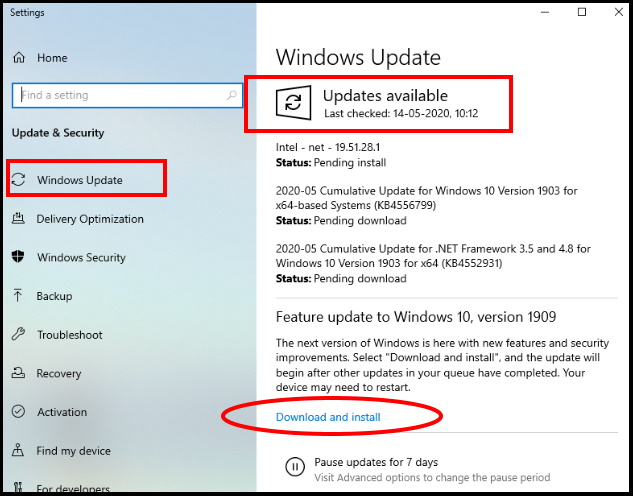
- Now Setting app will open.
- You will also see the list of available updates here.

- Click on Download and Install option.
- Follow on-screen instruction to complete the installation process.
- Once complete, check the error.
You can also download update directly from the Microsoft Update Catalog.
Ways-4: Uninstall recently installed Software
If you have recently installed any software or App in your windows 10 system, and due to this installation, the ERROR_NOT_SAME_DEVICE (Error 17) “The system cannot move the file to a different disk” began to appear in your system. You should uninstall or remove that app. There may be a conflict between to similar app or software. Follow these steps to complete the uninstallation process: –
- Open Control Panel.
- Go to the option Programs and Features.
- A list of installed apps in your system will display here.
- Find out the recently installed app that causes the error.
- Make a click on it.
- Select Uninstall option.
- Restart your system to save the changes.
Your recently installed app will no more available and accordingly you are free from the error.
Ways-5: Apply disk checking to Fix The system cannot move the file to a different disk in Windows 10
There may be a possibility of your disk drive infected with any virus or malware. You should apply Chkdsk (Disk checking utility) to check and scan the disk. The scan will detect for technical as well as physical errors on the disk drive. Follow these steps to complete this task and resolve the error regarding file access denied on another disk: –
- Open Run Dialog Box.
- Type cmd in it.
- Click on Yes to provide confirmation on UAC prompt.
- Now Command Prompt window will appear.
- Make a right click on it and select Run as Administrator option.
- Now type the following command after blinking cursor followed by Enter key: –
- chkdsk C: /f /r /x
- Let the system be check the disk drive for any error.
If the error due to infected disk drive, this workaround will definitely resolve the issue.
Ways-6: Delete Temporary files from your system
Sometimes temporary files restrict various task to complete. These temp files consume a lot of space in your system and computer becomes very slow in performance. Accordingly various error messages appear before completing any task. So you must clear temporary files from your computer. Go through these steps: –
- Press Win + R shortcut key conjointly.
- Run dialog box will open.
- Type the command %temp% in it and press Enter.
- A list of all the temporary files exist in your system will display here.
- Press Ctrl + A shortcut key to select all the items.
- Press Delete on your keyboard.
- Now type Temp in the typing field of Run box.
- Select all items by pressing Ctrl + A.
- Press Delete.
- All the temp files and folders will remove from your system.
- Now check whether the error removed or not.
That’s all.
