How to Share Printer on another Computer in Windows 10. As we all know that Microsoft has removed the HomeGroup feature from the version 1803. HomeGroup is the most convenient way o transfer files or folders over Network. You could also easily share your printers by using HomeGroup in previous version of Windows 10. But don’t worry, you can share Printers in Windows 10 without using HomeGroup.
How to Create and Check Homegroup in Windows 10
How to Share Printer on another Computer in Windows 10
When you share printers, shared printers will available on another computer. But you should make enable the File and Printer Sharing feature in Windows 10. Also the printer should be turn n as well as component PC which printer is being shared, also turn on. There are three ways to connect the share printer in windows 10. These are as under: –
Tips-1: Through Windows Settings App
To share a network printers to another computer, follow these steps: –
- Press Win + I shortcut key to open the Settings app.
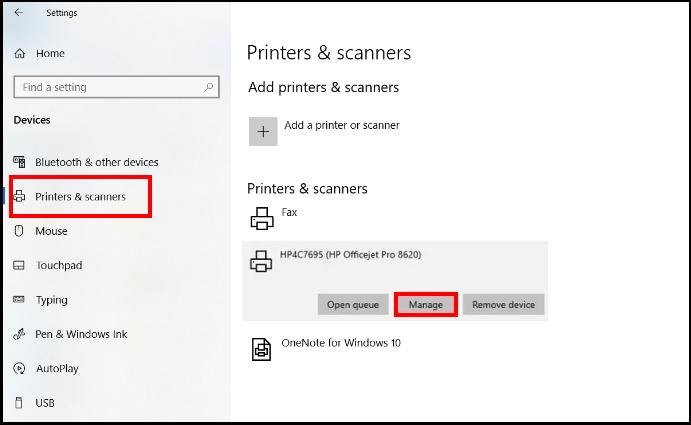
- Go to Devices section.
- Here choose the Printers & scanners option.
- Thereafter go to the right side, click on the printer you want to share.
- Click on the Manage button.

- Now on the next page, click on the link Printer properties.
- A new window will open.
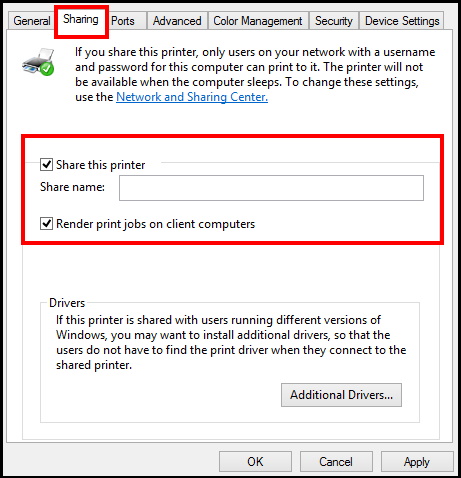
- Here go to the Sharing tab from the top menu bar.
- Mark the tick against option Share this printer to enable printer share.
- If you wish to change the name of printers, you can change from here by assigning under Share name.
- This name will be visible to other users on the network.
- Also Enable the option Render print jobs on client computers.
- Thereafter click on OK button to save the changes.
Tips-2: Share a Printer using Control Panel
You can also share printers over network to another computer through Control Panel. Go through these steps: –
- Go to start.
- Type cp in search box.
- Select Control Panel from top result.
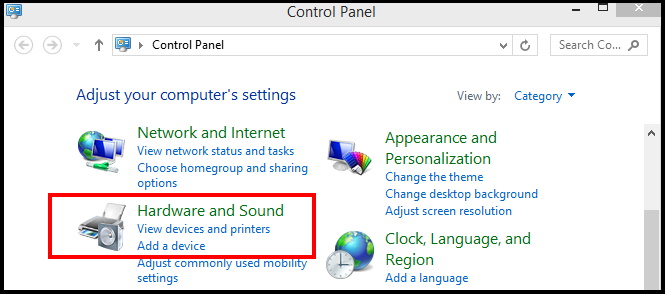
- From the top right corner, choose the option Category under View by section.
- Thereafter select the option Devices and Printers under Hardware and Sound section.

- Make a right click on the printer which you want to share.
- Choose the option Printer properties from the drop down menu.
- Here go to the Sharing tab from the top menu bar.
- Apply the tick next to the option Share this printer to enable printer share.
- If you want to change the name of printer, you can change from here under Share name.
- This name will be visible to other users on the network.
- Also Enable the option Render print jobs on client computers.

- Thereafter click on OK button to save the changes.
Tips-3: Through Windows PowerShell
- Go to Windows search option.
- Type powershell in it.
- Select Windows PowerShell from the top result.
- From the right side select the option Run as Administrator.
- Now type and Enter the following Command: –
- Get-Printer | Format-Table Name,ShareName,Shared

- It will show a list of all your printers and their sharing status.
- Now type the following command followed by Enter: –
- Set-Printer -Name “Printers name” -Shared $True -ShareName “Printer share name”
- You should put the name of your printer in place of Printer name in to the command.
- Now your printer is successfully shared with another computer.
You can also download this PC Repair tool to Locate and Fix any PC issue:
Step 1 – Download the Restoro PC Repair Tool
Step 2 – Click on Start Scan to find and Fix any PC issue automatically.
That’s all.

3 thoughts on “How do I Share Printer on another Computer in Windows 10”