How to change type of User Account in Windows 10. There are two types of account in a Windows system. The first one is Administrator account and the another one is Standard user account. Initially, when you install the Windows 10 in your system, you will see three user accounts created by default in your system. These are as under:-
- Administrator – Built-in Account for administrating the computer / Domain.
- Default Account – A user Account managed by the System.
- Guest account – Built-in Account for guest access to the Computer / Domain.
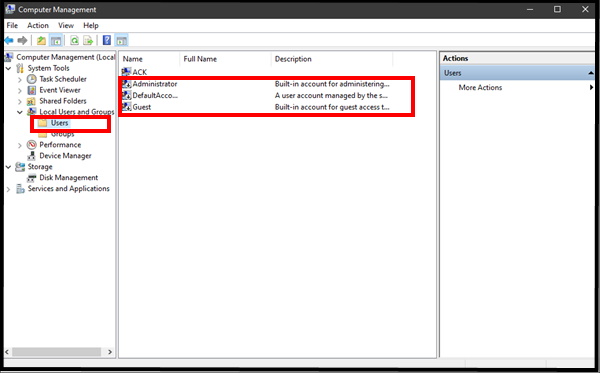
At the initial stage of installing Windows 10, Administrator account and Guest Account are not in active mode, only default account is active. You can change it in later stage.
Administrator Account Vs Standard User Account
The main difference between Administrator account and Standard User account is as under: –
Administrator Account
The users having Administrator account, can keep full control over the System. He can change or operate settings as well as installation and uninstallation of Apps, create or remove user account or change user account access and many more. The administrator user account holder can perform any type of configuration-related task in the system.
Standard User Account
The Standard users account holder having less controlling power and operate the basic system in normal manner. You can’t make any big changes to the system being a standard user account holder. With a standard user account, you can open office applications, web browsers and perform all basic tasks only. A Standard user account holder has not permission to create, edit, view, or delete system files. Because these system files are full control of Administrator account holder and keep sensitive data.
How to change type of User Account in Windows 10
Now a question raise that can we change the account type of user in windows 10? And the answer is yes. You can change type of user account from Administrator account to Standard Account and Standard Account to Administrator account. You may provide any users to administrative power as well as Standard user power.
Now we will discuss about How to change type of User Account in Windows 10 by various methods. There are Five ways by which we can complete this task. These are as under: –
- Through Windows Setting
- Through User Account itself
- Apply Command Prompt
- Use Control Panel
- Through PowerShell
Ways-1 : Through Windows Setting
You can change type of user account through Windows Setting. Follow these steps: –
- Open Windows Settings.
- Go to the Accounts section of setting page.
- Here make a click on Family & other users from the left pane of setting window.
- Under the Your family go to Other users field.
- Here you will find the list of users available. (In this screenshot, no any users are available)
- If you have any users, then select that user account.
- Click on the Change account type button.
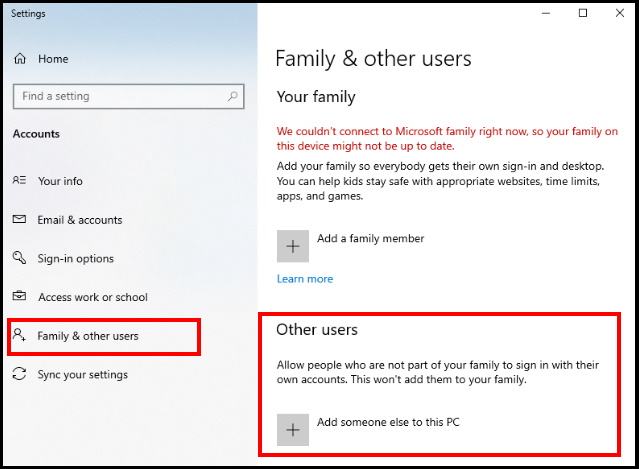
- Here you will find two option. the First one is Administrative Account and the second one is Standard user.
- Select the Administrator or Standard User account type as per your choice.
- Click the OK button.
- Don’t forget to restart your computer to make the changes effective.
Ways-2 : Through User Account itself
You may change the type of user account through User account option. Follow these steps to make the changes in User account: –
- Go to Start.
- Here search for netplwiz.
- A list of result will appear.
- Select the User Accounts option form the best match.
- User account window will appear on your screen.
- Here you will find a list of user account available in your system.
- Select that user account which you want to change.
- Accordingly click on the Properties button.
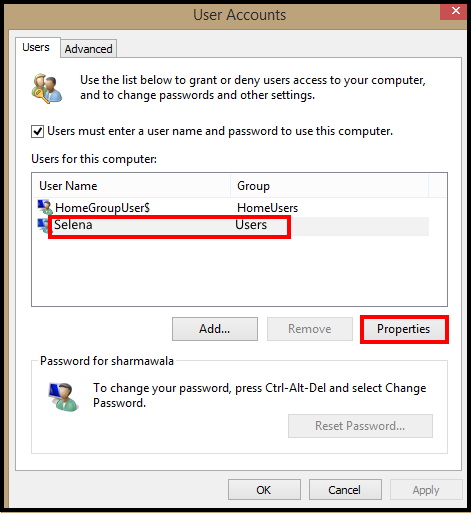
- Now go to the Group Membership tab.
- Select the Standard user or Administrator account type as per your choice.
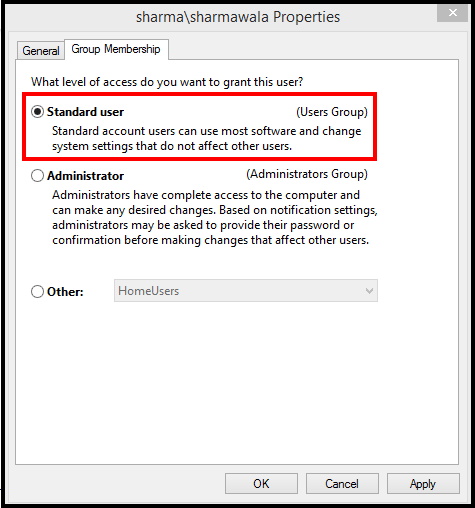
- Click the Apply button and OK button at both the window box.
- Restart your system after completion of changes of user account.
Ways-3 : Apply Command Prompt to change type of User Account in Windows 10
This method is little difficult because most of the users are not well aware about using Command Prompt. But if you frequently use command prompt, must apply this method to change type of user account. Follow these steps: –
- Open Run Dialog Box.
- Type cmd in it.
- Command Prompt window will open. Make a right click on it to Run as Administrator.
- For change account type to Standard user account: Type the following command after the blinking cursor followed by Enter key: – net localgroup Administrators “ACCOUNT-NAME” /delete
Note: If you’re trying to change an account using a Microsoft account, then the account name would be the first five letters of the email address.
- For change account type to Administrator user account: Type the following command after the blinking cursor followed by Enter key:
net localgroup Administrators "ACCOUNT-NAME" /add
After complete the procedure you must restart the system to make the changes effective.
Ways-4 : Use Control Panel to change type of User Account in Windows 10
We also change the user account by using Control panel. You should try it once. Follow these steps to complete the process: –
- Open Control Panel.
- Navigate User Account option.
- Make a click on it to open.
- Here click on the Change account type option.
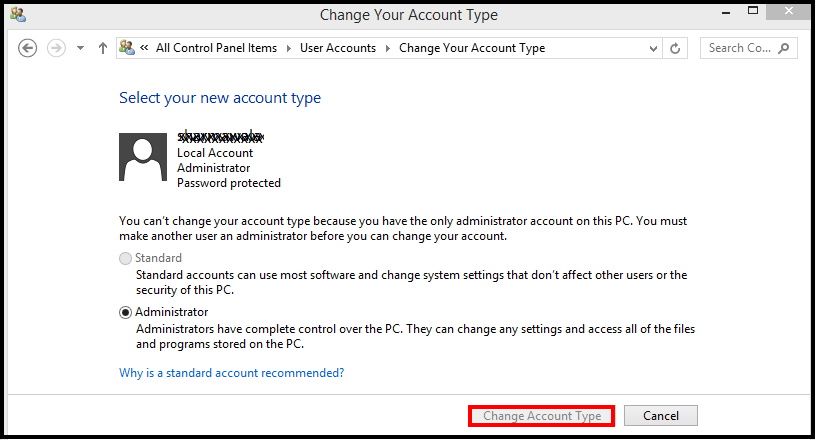
- Select the account that you want to change.
- Click the Change the account type option.
- You will see both the option Administrator and Standard account available here.
- Select either Standard or Administrator as required.
- Click the Change Account Type button.
Ways-5: Through PowerShell
PowerShell is also a medium by which you may change the type of User account in Windows 10.
- Open Start.
- Search for PowerShell, right-click the top result, and select the Run as administrator option.
- For change account type to Standard user account: Type the following command after the blinking cursor followed by Enter key:
Remove-LocalGroupMember -Group "Administrators" -Member "ACCOUNT-NAME"
Note: If you’re trying to change an account using a Microsoft account, then the account name would be the first five letters of the email address.
- For change account type to Administrator user account: Type the following command after the blinking cursor followed by Enter key:
Add-LocalGroupMember -Group "Administrators" -Member "ACCOUNT-NAME"
- In the command, make sure to change the ACCOUNT-NAME for the actual name of the account that you want to change.
That’s all..
