How to Format USB Flash Drive in Windows 10. USB Flash Drive having more capacity than a floppy disks or CDs used for data backup and storage of useful data as well as transferring of computer files. But sometimes, it get malicious objects and corrupted. In this case, you have to format it so that malicious objects could be removed from USB Flash Drives. Here is how to format USB drive.
How to Format USB Flash Drive in Windows 10
In this article, we will discuss how to format USB Flash drive in windows 10 by using File explorer, Disk Management, Command Prompt and PowerShell.
Format USB flash drive with File Explorer
To format a USB flash drive using File Explorer on Windows 10, follow these steps:
- Press Win + E to open File Explorer.
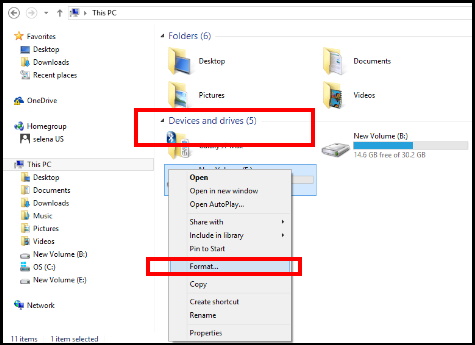
- Make a click on This PC from the left menu.
- Now go to the Devices and drives section.
- Make a right-click on the flash drive and select the Format option from the drop down menu.
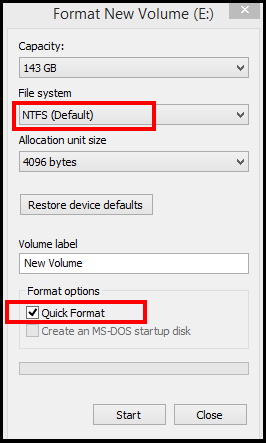
- Use the File system drop-down menu and choose the option NTFS.
- Under the “Allocation unit size” drop-down menu, use the default selection.
- In the “Volume label” field, confirm a drive name that will appear in File Explorer.
- Thereafter under the “Format options” section, select the Quick format option.
- Click the Start button.
- At the end, make a click on the Yes button.
How to format USB flash drive through Disk Management
You can also format USB Flash Drive by using Disk Management tool. There are two methods to apply disk management tools. The first one is format the storage to rebuild the file system and clean the content. The second one is remove the drive partition to fix the storage issue.
Follow these steps to format a USB Flash Drive by using Disk Management: –
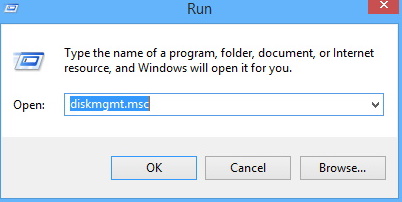
- Open Run Dialog Box.
- Type diskmgmt.msc in it and press Enter key.
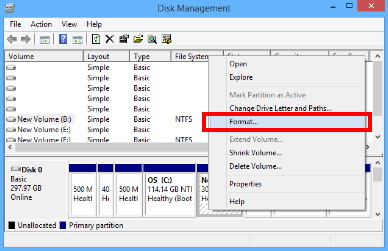
- Disk Management window will open now.
- Here navigate the unused volume or which you want to delete.
- Make a right click on it.
- Select the option Format from the drop down menu.
- In the “Volume label” field, put a name to identify the storage in File Explorer.
- Use the “File system” drop-down menu and select the NTFS option.
- You have option to choose “FAT32” or “exFAT” option instead.
- In the “Allocation unit size” drop-down menu, choose the Default option.
- Mark the check against the Perform a quick format option box.
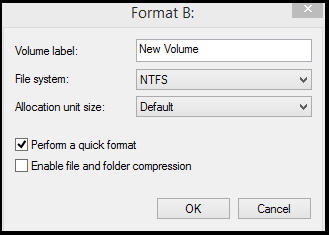
- Click on the OK button.
Clean and format USB flash drive
If you are encountering errors or other problems, you may apply clean and format flash drive by using Disk management. Go through these steps: –
- Open Start.
- Look for Create and format hard disk partitions and click the top result as Disk Management tool.
- Make a right-click on the removable storage.
- Choose the option Delete volume.
- Thereafter click on the Yes button.
- Now apply a right-click on the “Unallocated” space and choose the New Simple Volume option.
- Then click on the Next button.
- Click the Next button again to use all the available space.
- Select the Assign the following drive letter option.
- Use the drop-down menu to select one of the available letters.
- Click the Next button.
- Select the Format this volume with the following settings option.
- Use the File system drop-down menu and select the NTFS option.
- Under the “Allocation unit size” drop-down menu, choose the Default option.
- Under the “Volume label” field, type a label to identify the flash drive in File Explorer quickly.
- Thereafter make the check against the box Perform a quick format option.
- Then make a click on the Next button.
- At the end, click on the Finish button.
This process will create a new partition and set up the file system, resolving simple issues with the flash drive, including data corruption.
How to Format USB Flash Drive by using Windows PowerShell
This is the another way to format USB Flash drive. You may use PowerShell commands to format a USB flash drive to erase its content. To format a USB flash drive using PowerShell commands, follow these steps: –
- Go to Start.
- Type PowerShell in the search field.
- Select the top result as PowerShell.
- Go to the right side and choose the option Run as administrator.
- Now type the following command after blinking cursor in the PowerShell window followed by Enter key: –
- Format-Volume -DriveLetter DRIVE-LETTER -FileSystem FILE-SYSTEM -NewFileSystemLabel DRIVE-NAME
- In the command, replace from the following: –
- DRIVE-LETTER with the correct letter reflecting the drive you want to format.
- FILE-SYSTEM for FAT32, exFAT, or NTFS.
- DRIVE-NAME with the name you want the device to appear in File Explorer.
- Here is the example – We will format D drive of system with the NTFS . Apply these command line: –
- Format-Volume -DriveLetter F -FileSystem NTFS -NewFileSystemLabel New drive
- If you want to apply a full format of drive, go through these commands and press Enter: –
- Format-Volume -DriveLetter DRIVE-LETTER -FileSystem FILE-SYSTEM -Full -Force
Now Windows PowerShell will format your storage device as per your settings applied.
Clean and format USB Drive through Windows PowerShell
You may clean and format removable drive by using Windows PowerShell. Go through these steps: –
- Go to Start.
- Type PowerShell in search area.
- Apply a right-click on the top result, and choose the option Run as administrator.
- Now type the following command to view the flash drive you want to format and press Enter:
- Get-Disk
- To delete the volume, type the following command and press Enter:
- Get-Disk DISK-NUMBER | Clear-Disk -RemoveData
- Here change DISK-NUMBER to the correct number representing the flash drive you are formatting.
- Thereafter type Y to confirm the action and press Enter.
- Now you should create a new partition. To do so type the following command and Press Enter key: –
- New-Partition -DiskNumber DISK-NUMBER -UseMaximumSize
- Here, change DISK-NUMBER to the correct number representing the storage you are formatting.
- To assign a drive level and applying quick format, go through these commands followed by Enter key: –
- Get-Partition -DiskNumber DISK-NUMBER | Format-Volume -FileSystem FILE-SYSTEM -NewFileSystemLabel DRIVE-NAME
- Here, change DISK-NUMBER to the number that identifies the storage in the system.
Use Command Prompt to Format Flash Drive Windows 10
You can also use command prompt window to format USB Flash Drive as well as clean drive. Follow these steps to complete the process: –
- Open Run dialog box by pressing Windows + R shortcut key.
- Type cmd in it.
- Command Prompt window will open now.
- For applying quick format of flash drive, type the following command and press Enter: –
- format VOLUME: /v:FLASHDRIVE-LABEL /fs:FILE-SYSTEM /q
- Here, replace the VOLUME to the correct drive letter of the storage
- Replace FLASHDRIVE-LABEL with the name you want the drive to appear in File Explorer.
- FILE-SYSTEM with available file systems, such as “FAT32,” “exFAT,” or “NTFS.”
Clean and format USB Drive using command-line
To clean and format a flash drive by using Command Prompt, follow these steps: –
- Open Command prompt window and choose Run as administrator option.
- To open the diskpart tool, type the following command and press Enter: –
- diskpart
- Type the following command to view a list of the available drives and press Enter:
- list disk
- To delete a flash drive, type the following command and press Enter:
- select disk DISK-NUMBER
- Here, replace DISK-NUMBER to the number representing the drive you are trying to format.
- Type the command clean to remove the partition and Press Enter.
- Type the following command to create a primary partition and press Enter:
- create partition primary
- If you want to apply quick format, type the following command and press Enter:
- format fs=FILE-SYSTEM label=DRIVE-NAME quick
- Here, replace FILE-SYSTEM with your preferred file system, such as “FAT32,” “exFAT,” or “NTFS.”
- Also, replace DRIVE-NAME with the name you want to give the device.
- Type the following command to assign a drive letter and press Enter:
- assign
- Type the following command to close diskpart and press Enter:
- exit
That’s all.
