How to Stop from Sleep Mode in Windows 10. Sleep mode is very useful feature in windows 10. Enabling this feature will create a security layer of your PC specially when you are using your system in official capacity. When you have to leave your system alone, it goes to sleep mode after a while and required password for startup. No one can operate it without password. But sometimes it annoys when you have to enter password for wake up your system after a short while. Today in this article, we will see how to restrict or stop from sleep mode in windows 10. Be continue with this page.
How to Stop from Sleep Mode in Windows 10
We will see how to Stop from Sleep Mode in Windows 10 by 06 ways. You may apply any one of them to fix your issue. These are as under: –
- Through Registry Editor
- Set your Power Plan setting as Default
- Apply Windows In-built Troubleshooter
- Reset Power Button setting
- Reset your Screensaver setting
Ways-1: Through Registry Editor
- Open Run Dialog Box
- Type regedit in it and press Ok.

- Registry window will open.
- Navigate the following path from the left side of Registry window.
- HKEY_LOCAL_MACHINE\SYSTEM\CurrentControlSet\Control\Power\PowerSettings\238C9FA8-0AAD-41ED-83F4-97BE242C8F20\7bc4a2f9-d8fc-4469-b07b-33eb785aaca0
- Now go to right side of selected path.
- Male a double click on Attributes DWORD.
- Change the value data from 1 to 2.
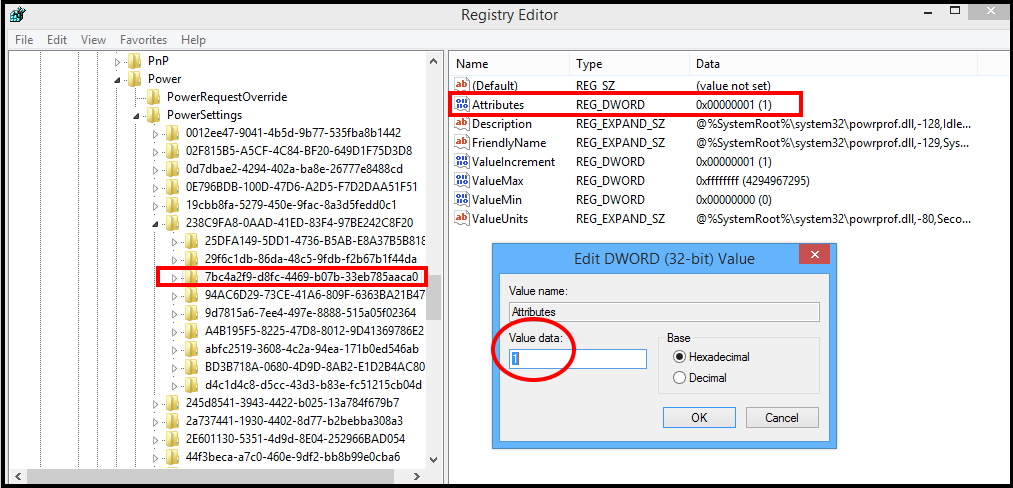
- Click on Ok button to save the changes.
Now you will have to change the power setting. Follow these steps to complete the process: –
- Go to Windows Search option.
- Type Power & sleep setting and click on it to open.
- From the right pane of setting page, click on Additional Power Setting option.
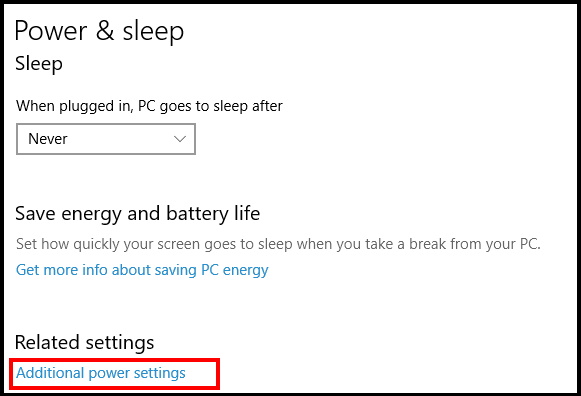
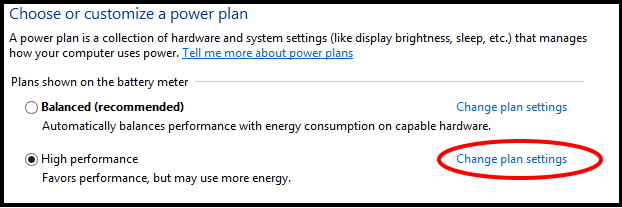
- Now go to the active power plans of your system.
- Here select Change plan settings.
- Now select Change advanced power settings.
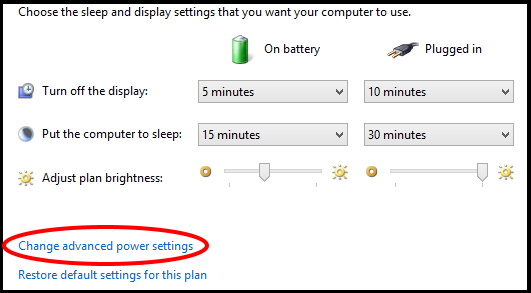
- Here click on Change settings that are currently unavailable.
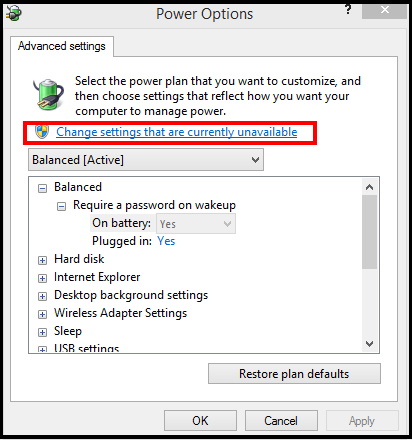
- Navigate Sleep option and click on it to expand.
- Select System unattended sleep timeout.
- Here change the value from 2 to 30 minutes.
- Click on Ok button to save the changes.
Ways-2: Set your Power Plan setting as Default to Stop from Sleep Mode in Windows 10
Sometimes default power plan setting may be helpful to Stop from Sleep Mode in Windows 10. You should restore your default power plan setting in windows 10. Follow these steps: –
- Launch Windows Search option.
- Find out Power & sleep setting and click on it to open.
- Click on Additional Power Setting option.
- Now go to the current power plans of your system.
- Here select Change plan settings.
- Now click Restore default settings for this plan.
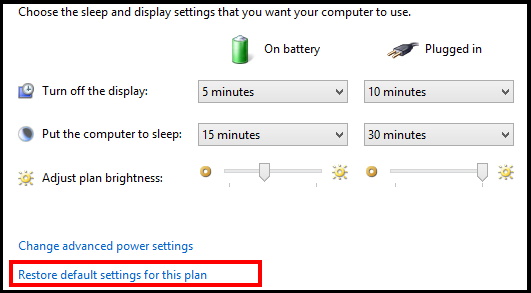
It will restore your default power plan setting and stop from sleep mode.
Ways-3: Apply Windows In-built Troubleshooter
If you are facing an error that windows automatically goes to sleep mode even after change power plan setting, apply troubleshoot option. Windows in-built tool troubleshooter may help to resolve automatic sleep mode in windows 10 system. This will automatically detect your issue and fix them accordingly.
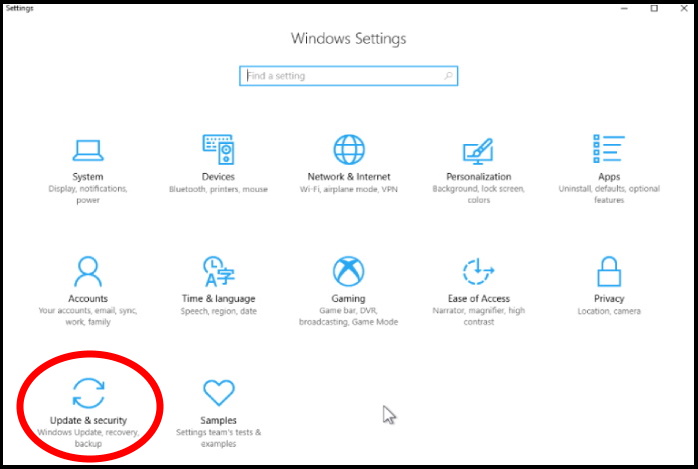
- Open Windows setting.
- Go to Update & Security option.
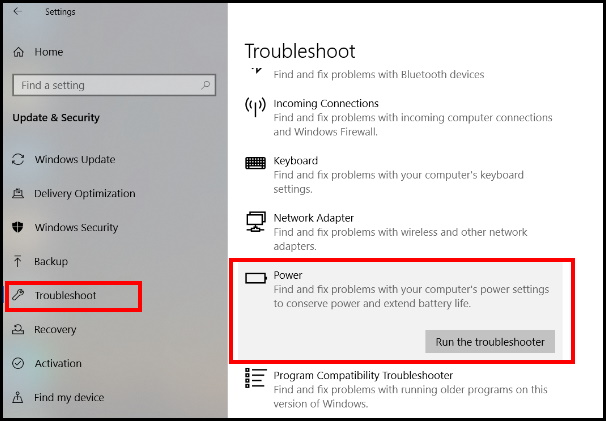
- From the left pane of setting page, select Troubleshoot option.
- Accordingly from right pane, select Power troubleshooter.
- Click on Run the troubleshooter button.
- Windows will automatically detect the issue and fix them accordingly.
- Follow on-screen instruction to complete the process.
Ways-4: Reset Power Button setting to stop from sleep mode in windows 10
If your system automatically goes to sleep mode after a short while, there is a possibility of error in power setting button. You should change in power button setting. Go through the following steps: –
Again open Power option window.
Make a click on Choose what the power button does from the left side of page.

- Now go to the option When I press the power button.
- Click on small arrow icon and select Do noting option from the drop down menu.

Ways-5: Reset your Screensaver setting
If your system automatically goes to sleep after a while, this may be due to screen saver setting. Sometimes screen saver sends the windows to sleep mode. So you should make changes in screen saver seting to resolve this issue.The following steps will help to change in screen saver setting in windows 10 PC: –
- Launch Windows Setting.
- Go to Personalization option.
- From the left menu of setting page, select the Lock screen option.
- Go through the screen saver setting from the right pane.
- Set the Wait time to maximum value as per your requirement.
- Now click Apply and OK to save changes.
- Alternatively, you may select not to use any screensaver.
That’s all.
