Let us Know about UEFI BIOS Settings in Windows 10. BIOS full form is Basic Input Output System. By name itself, it is an independent operating system that control the motherboard of your system. It keeps vigil on everything connected with your computer, such as hard drive, video adapter, printer, mouse, keyboard etc. As soon as you on the power button of your computer or Laptop, BIOS starts its work. BIOS loads every thing which helps in startup of your system. It helps in initializing of Hardware installed in your system.
Now question arises that what is UEFI? The modern system having UEFI firmware stands for “Unified Extensible Firmware Interface” is successor of traditional BIOS. Both are responsible for startup process and also maintain communication between motherboard and operating system. There are little difference between BIOS and UEFI i.e only differ in look. UEFI offers support in larger space than BIOS. Faster booting option and having more modern features. UEFI is faster and has improved security features compared to BIOS. Both terms, however, are often used interchangeably by most users.
How to Access UEFI BIOS Settings in Windows 10
Even after BIOS is an in-built feature of windows, We can’t access it directly from windows. It is a pre boot process of windows. In few older version of windows, we may access to BIOS by pressing any key while windows just startup. Here in this article we will discuss how to access UEFI (BIOS) Setting in Windows 10 . Follow these steps: –
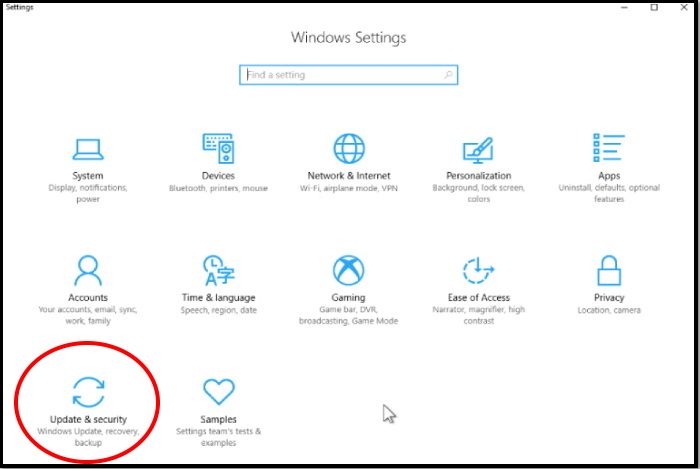
- Open Windows Setting.
- Select Update & Security.
- Now from the menu of left side, select Recovery option.
- Go to right pane and click on Restart Now button located under Advanced Startup option.
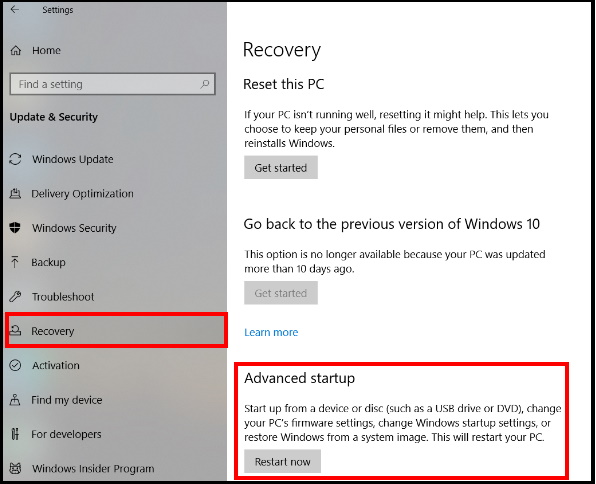
- As soon as you click Restart now tab, your PC will start to boot.
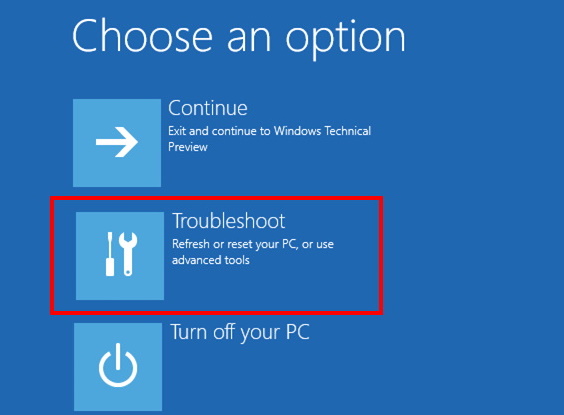
- While rebooting, you will access to Advance Startup Screen.
- Here select the Troubleshoot option.
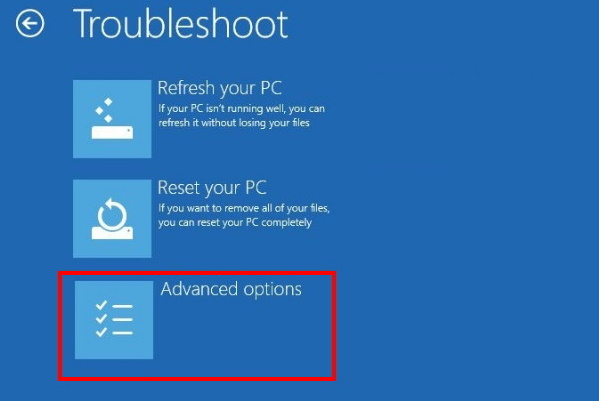
- Under troubleshoot, tap on Advanced options at the bottom part.
- Select on Startup Settings.
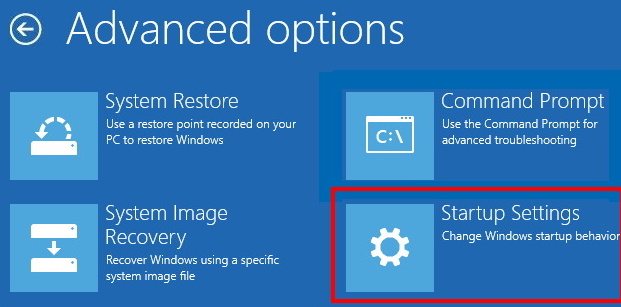
- In the next screen. you will find a group of seven options.
- You should Nothing do it on this page.
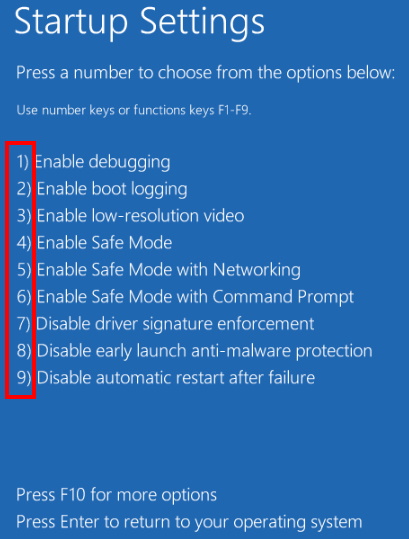
- Restart your system where you find these options allotted with function keys.
- Here you will find a list of nine different options with serial number. These serial number indicates the function key from F1 to F9.
- To choose any one of these you need to press the concerned function key.
- F10 brings more options and Enter access you to Operating System.
Features of BIOS Setting
Generally users are not well aware about BIOS setting of Computer, so they don’t try to access it. But if you want to be a computer expert, you must have knowledge of BIOS setting. Through BIOS setting, many issue can be solved easily. To make changes through BIOS setting is very critical. If you not well aware, never try to operate it. Your computer might be at risk due to little knowledge of BIOS in Windows system. Changing BIOS settings can also enhance the convenience and security of your computer.
There are lot of functions are available under BIOS setting. These are as under: –
- Auto Start of Computer connected through LAN: BIOS having the system clock. You may start all computers at a time at a workplace connected through LAN by using BIOS Setting.
- Secure your system with BIOS password: You may create an additional password for better security of your system through BIOS password.
- Wake on LAN: If you turn on this setting, you can operate computer remotely as well as start a remote session even after the computer has shut down.
- Boot device options: There are several boot options available through BIOS setting by default.
List of another Feature of BIOS settings
- Set the Boot Order
- Change the Date and Time
- Change or Remove a BIOS Password
- Create a BIOS Password
- Change Floppy Drive Settings
- Change Hard Drive Settings
- Reset CD/DVD/BD Drive Settings
- View Installed Memory
- Change the Boot Up NumLock Status
- Enable or Disable the Computer Logo
- Enable or Disable the Caching of BIOS
- Change CPU Settings
- Change Memory Settings
- Enable or Disable the CPU Internal Cache
- Change System Voltages
- Enable or Disable Onboard Serial/Parallel Ports
- Enable or Disable ACPI
- Change the ACPI Suspend Type
- Change the Power Button Function
- Reset Fan Speed Settings
- View CPU and System Temperatures
- Display Fan Speeds
- Change Power-on Settings
- Change Display Initialisation First on Multi-Display Setups
- Reset Extended System Configuration Data (ESCD)
- Enable or Disable BIOS Control of System Resources
- View System Voltages
How to Operate BIOS Setting in Windows 10
1. Use the following keys to navigate the BIOS Setup Utility:
- For selection of main menu, use the left and right arrow keys.
- To select an item on the screen, use the up and down arrows.
2. Press Enter to select the item.
3. To change the option, use the up or down arrow keys or the + or – keys.
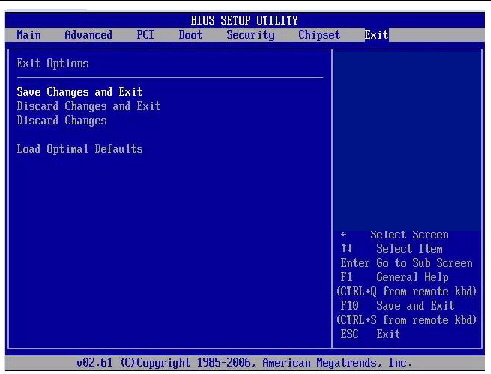
4. If you want to save the changes that you made, highlight the Save Changes and Exit option and press Enter.
5. As soon as you exit the BIOS Setup Utility, the server boots.
6. If you’ve made changes to BIOS settings, those changes are valid with the system boot.
How to change UEFI (BIOS) Setting in Windows 10
You can make a lot of changes through BIOS setting such as Date & Time, Password, First Boot utility, Change your Fan speed etc. Because the BIOS is linked with computer’s motherboard and the appearance of each computer’s BIOS will vary slightly depending on the manufacturer. Windows 10 allows you a lot of options you can configure directly within the operating system, but some changes only made through BIOS setting. These are as under: –
Know about BIOS Controls
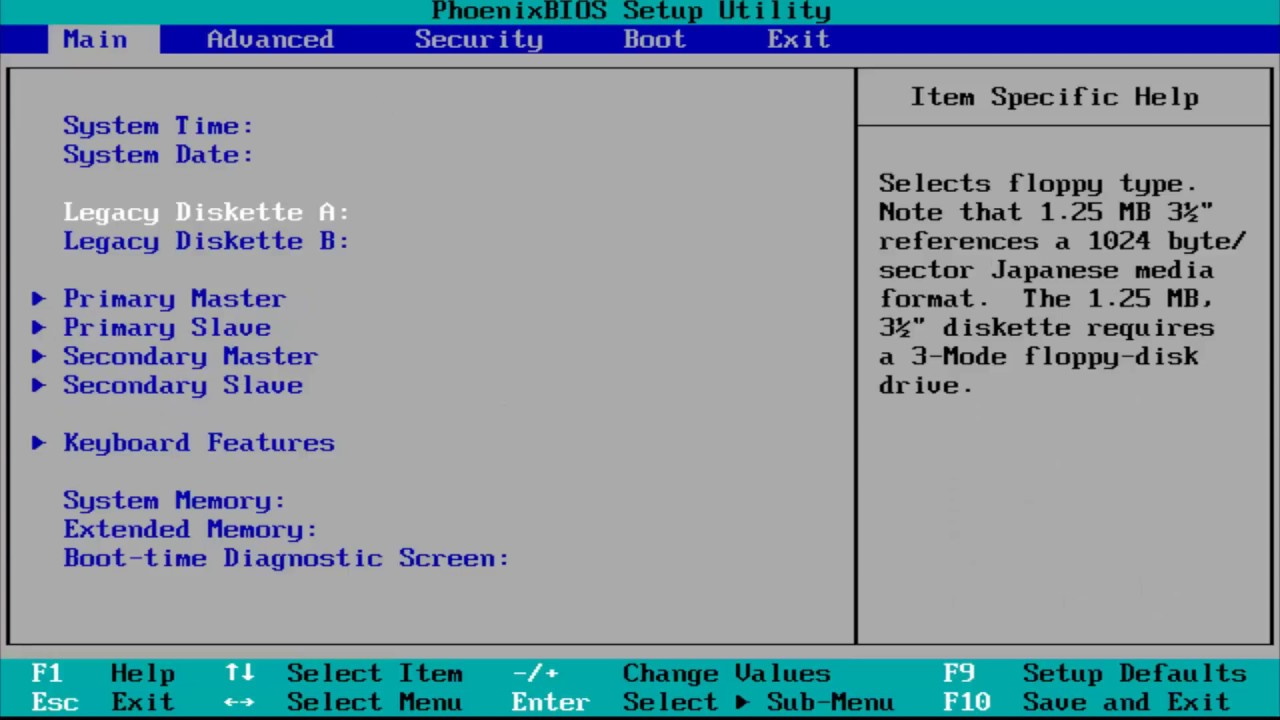
As we know, BIOS don’t support and allow mouse input, you’ll need to use the arrow keys and other computer-specific keys to navigate the BIOS. See the below mentioned screenshot to familiarize with BIOS setup Utility. During work with BIOS setup utility, you should be more careful and concentrate. Your one wrong input may cause heavy damage to your system software.
Replace the First Boot Device
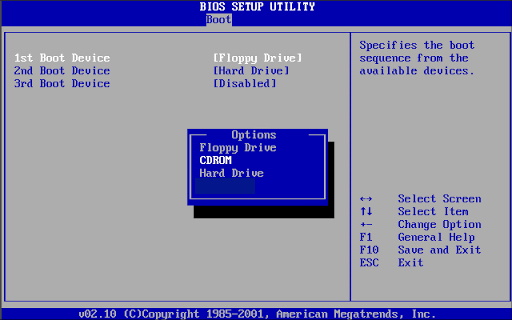
If you want to change what device to boot from, enter the Boot menu. From here, you can designate which device the computer will attempt to boot from first. This is useful for booting from a disc or flash drive to install or repair an operating system.
- Use up or down arrow key to select Hard Disk from the menu list.
- After selection, press + or – key to move your selected device at the top as first boot menu device.
- Now Press F10 key to save your changes and for Esc to exit Boot Menu. (The key will different for different system)
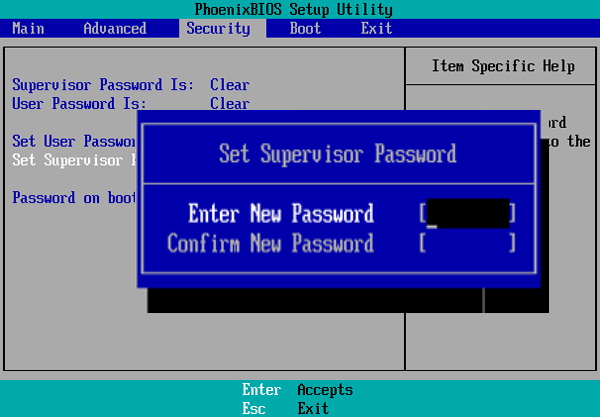
Set a BIOS Password
- Open BIOS setting by applying method at the top of this article.
- Now navigate to the Security or Password section. You can use the arrow keys to navigate between these sections.
- Under the Security or Password section, look for any entry named Set supervisor password, User password, System password, or a similar option.
- Select the correct option and set a strong password.
Change Date and Time Setting under BIOS setting in Windows 10
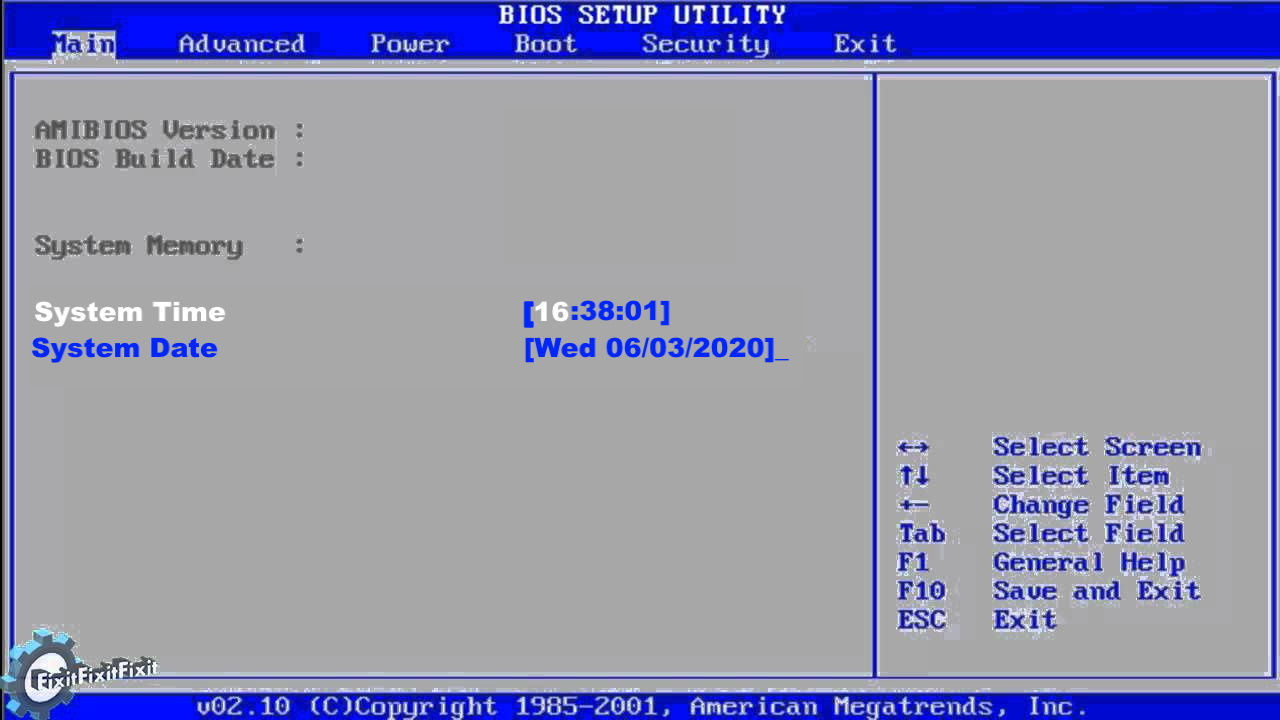
BIOS clock also control over your window clock. So in case of certain activity such as change of battery, change of setting, BIOS clock may change automatically. You should reset it by the following steps: –
- Open BIOS Setup Utility.
- In the system setup menu, locate the date and time.
- Using the arrow keys, navigate to the date or time, adjust them to your liking, and then Save and Exit.
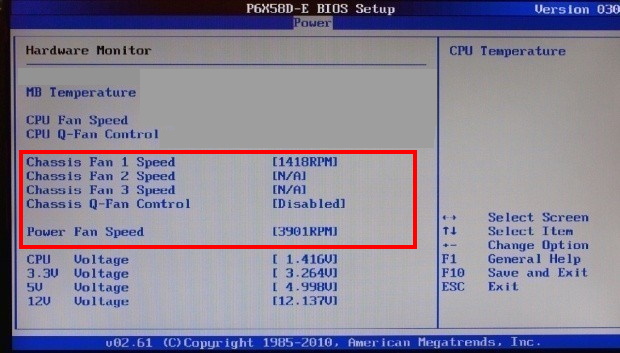
Change Speed of Fan and System Voltage
- Enter the BIOS setting option.
- Go to the Monitor status through scrolling or keys.
- Select Fan Speed control option. (Name will vary in different computer as per manufacturer)
- Scroll down to the “Fan Speed Control” section of the page.
- This section contains the RPM settings for the computer fans.
- Select the fan you would like to turn up and press “Enter.”
- Choose the desired speed from the list and press “Enter” again to save the setting.
Save and Exit option under BIOS setting in Windows 10
Hopefully, you will now expert of BIOS and UEFI setting in Windows 10.
People also look for:
- How to open BIOS Windows 10
- How to open BIOS Windows 7
- What is BIOS setup
- How to Enter BIOS
- BIOS setup utility
- How to access BIOS Setup in Windows 10
- How to enter BIOS setting in Windows 10
That’s all.

3 thoughts on “Let us Know All about UEFI BIOS Setting in Windows 10”