How to Fix Windows Update Component Must be repaired error in Windows 10. As we know, Microsoft is not going to introduce any new version of Windows in near future. Microsoft releases its cumulative updates on their patchday each month. Through these updates, Microsoft try to address various bugs, issues related to Windows 10. All these windows updates are necessary, because they are important to keep the system safe and secure. So Windows updating is an important process and you should keep update your windows 10 system on regular basis.
But sometimes users have to face certain updating errors. Some of the Windows update component not function properly and accordingly Windows update failed to install latest updates. Some of the windows update components either missing or corrupted. When you try to update your windows 10 system an error message appears on your screen duly quoted: –
How to Fix Windows update failed to install in Windows 10
“Windows Update components must be repaired, One or more windows update components are configured incorrectly”
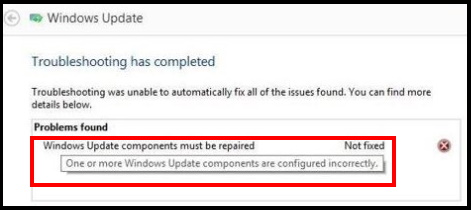
How to Fix Windows Update Component Must be repaired error in Windows 10
If you are also facing such type of messages while updating Windows 10, here are the solution to fix the issue.
Ways-1: Enable Load System Services through System Configuration
- Open Run Dialog Box by pressing Win + R key.
- Type msconfig in it and press Enter.
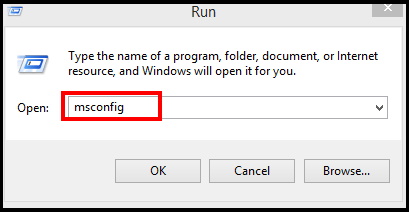
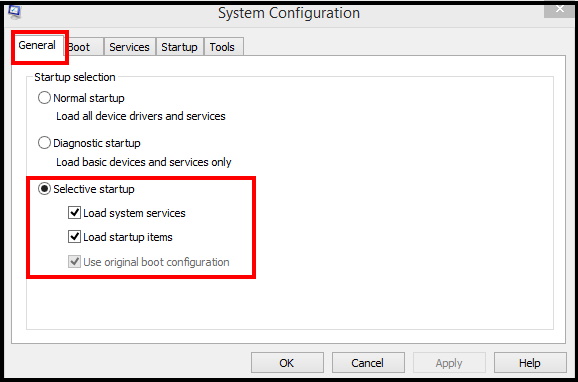
- System Configuration window will open now.
- Go to the General tab from top menu bar.
- Choose the option Selective Startup.
- Then clear the checkbox next to Load Startup Items.
- Thereafter make the check against boxes next to Load System Services and Use Original boot configuration
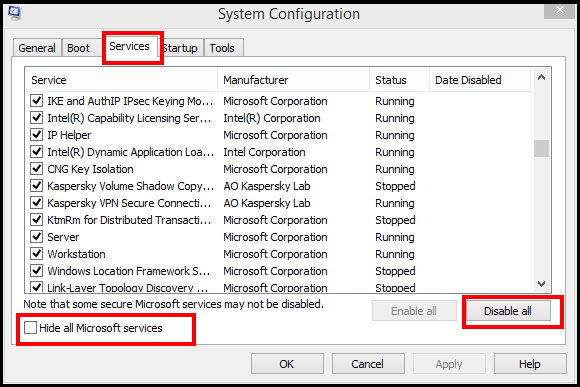
- Now go to the Services tab.
- Check the box next to Hide All Microsoft Services.
- Thereafter click on the option Disable all.
- At the end, click on Apply and then OK button to save the changes.
- Restart your Windows 10 PC.
- Now Download the Windows Update Troubleshooter from Microsoft.
- Run it while in Clean Boot State.
Ways-2: Apply System File Checker to Fix Windows Update Component Must be repaired error in Windows 10
Any corrupt file system may be a cause of Windows Update Component Must be repaired error in Windows 10. You should apply sfc / scannow command to resolve the issue.
- Open Run Command by pressing Win+R shortcut key conjointly.
- Type CMD in it and press Enter.
- Command Prompt window will open now.
- Make a right-click and select Run as Administrator.
- Type sfc/scannow.
- Press Enter.

Ways-3: Apply DISM tool
Even after applying Sfc /scannow, you are still facing the same issue again, you will have to run a DISM or Deployment Image & Servicing Management Scan on your PC. Through DISM scan, you can repair corrupt system files that was not scanned through SFC scan. To run a DISM scan, follow these steps: –
- Open Command Prompt window.
- Apply a right click on it and select Run as Administrator.
- Type the following command in black window after blinking cursor: –
- DISM /Online /Cleanup-Image /RestoreHealth
- Press Enter.
The DISM scan will also take some time to complete. When the scan is finished, you will have to run the SFC scan again.
Ways-4: Apply these Commands to Fix Windows Update Component Must be repaired error in Windows 10
There are lot of commands related to Windows update that helps in resolving various issues pertaining to Windows update. You should apply these commands through Command Prompt. Follow these steps: –
- Press the Win + R keys together to launch the Run command box.
- Go to Run command search field.
- Type cmd and press the Ctrl + Shift + Enter shortcut keys to open Command Prompt with administrator rights.
- In the Command Prompt window, enter the following command one by one followed by Enter key each time:
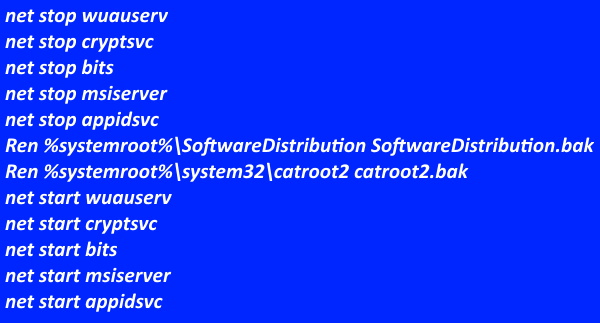
- Now go to Start.
- Make a right click on it and choose the option Windows PowerShell (Admin).
- Type the following command after blinking cursor in PowerShell Window: –
- wuauclt.exe /updatenow
- Press Enter.
- Let the window complete the process.
- Once done, restart your system and check whether the issue resolved or not.
Ways-5: Apply Troubleshoot through Windows Recovery option
- Press the Win + I keys conjointly to open Windows Settings.
- In the Settings window, click on the Update & Security options.
- In the next window, go to the left side of the page and choose the option Recovery.
- Thereafter, go to the right side of the window, scroll down.
- Here you will find the Advanced start-up section.
- Make a click on Restart now.
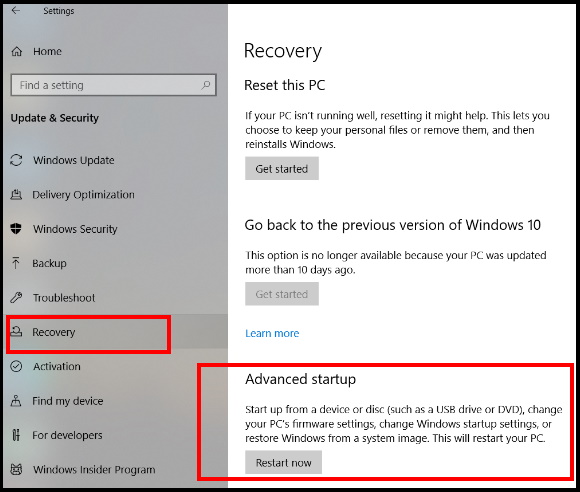
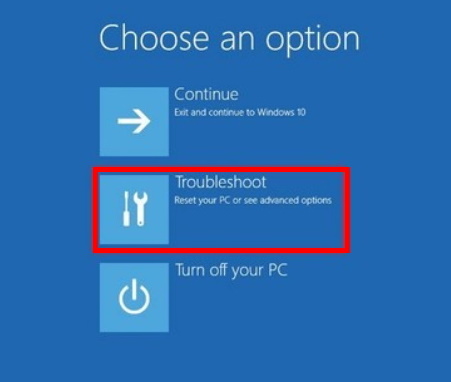
- Now you will on a new page Choose an option under Advanced startup options.
- Select the option Troubleshoot.
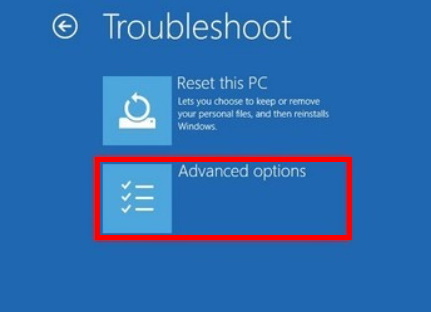
- Next, click on Advanced options.
- Thereafter, select Startup settings.
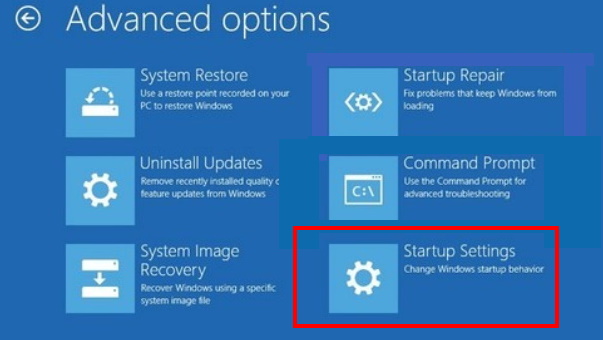
- In the Startup Settings screen, click on the Restart button located at the bottom.
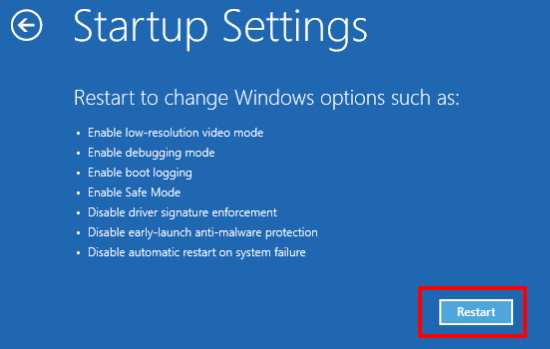
- Now, press the F4 key on your keyboard and your Windows will restart in safe mode.
- Now, open File Explorer by pressing the Win + E shortcut key.
- Here navigate the following path: C/Windows/Software Distribution.
- Select all content of this folder by pressing Ctrl+A.
- Press Delete.
- Restart your system.
- Hopefully you the issue will resolve, if not, go to the next fix.
Ways-6: Clear Windows Update Files through Services
- Go to Run Command.
- Type services.msc in it and press Enter.
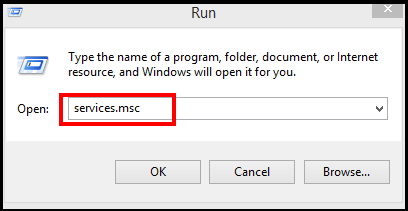
- Services window will open now.
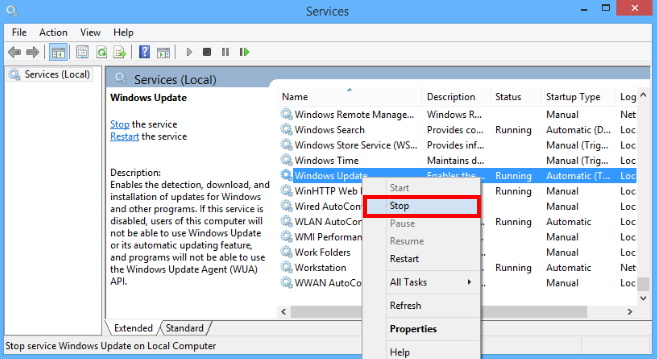
- Here find out the option Windows update services.
- Make a right click on it and choose the option Stop from the drop down menu.
- Now press Win + E shortcut key to open File Explorer in Windows 10.
- Navigate the following path: –
- C:\Windows\SoftwareDistribution\Download
- Select all the content of this folder by pressing Ctrl + A shortcut key.
- Press Delete.
- Now again to the services window.
- Make a right click on the option Windows Update.
- Choose the option Start from the drop down menu.
- Now, go to the Windows Update section in Settings and check for updates.
Ways-7: Pause Update Temporarily to Fix Windows Update Component Must be repaired error in Windows 10
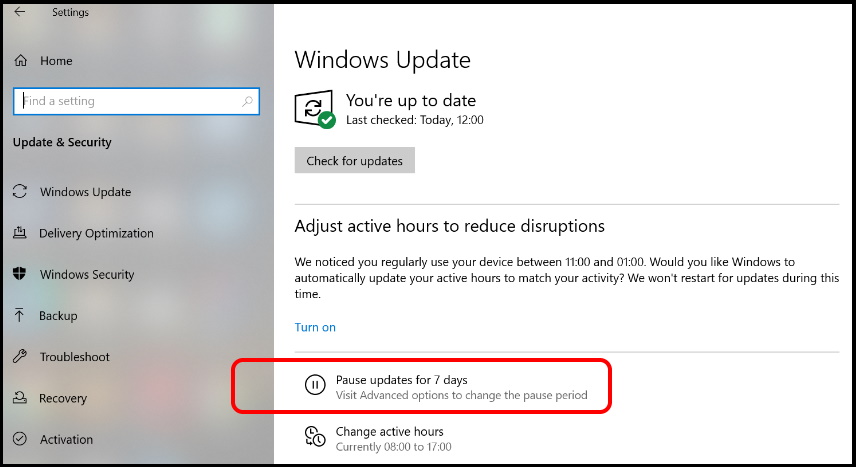
- Press Win + I shortcut key.
- Windows Setting is open now.
- Choose the option Update & Security.
- Now from the left pane of setting window, choose the option Windows update.
- Click on the option Pause update for 7 days.
- Now Restart your system.
- Again go to the settings window.
- Click on the option Resume updates.
Ways-8: Release Extra space using Windows Setting
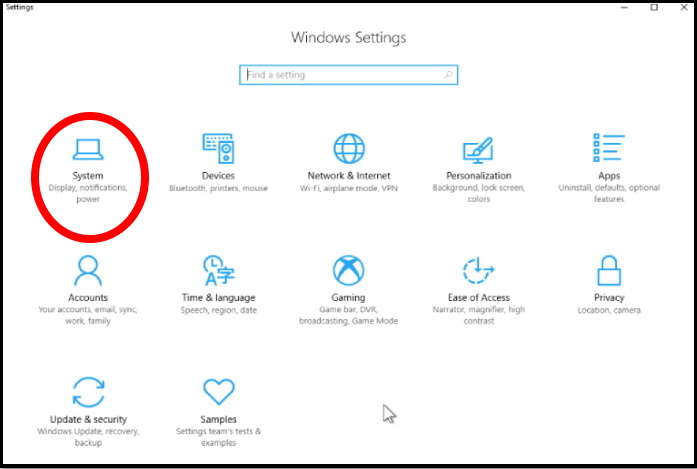
- Open Windows Settings.
- Choose the option System.
- From the left pane of settings window, go to the option Storage.
- Thereafter go to the right side of same page.
- Under the Local Disk (C) section, make a click on Temporary files.
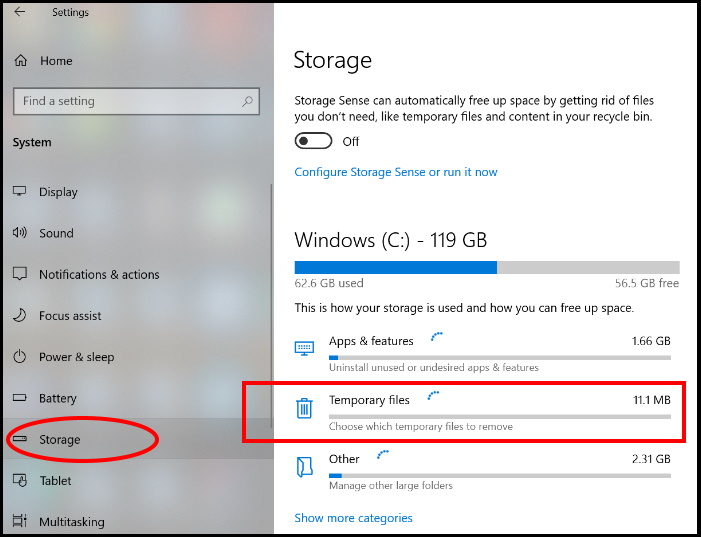
- Let the window scan the Temp files., wait a while.
- A list of items will appear on your screen.
- Choose that items, not required any more to delete from the system.
It will release extra space in your windows 10 system as well as resolve the Issue regarding Windows Update Component Must be repaired error in Windows 10.
Ways-9: Restore Default settings of Windows Update Component
- Open Run Dialog Box.
- Type cmd and press Ok button.
- Command Prompt window will open.
- Apply a right click on it and select the option Run as Administrator.
- Now type the following command after blinking cursor one by one followed by Enter key on each command: –
- To stop the BITS service in Windows 10 Enter the command: net stop bits

- To stop the Windows update service in Windows 10, enter the command: net stop wuauserv

- Thereafter enter the under mentioned command: –
- Del “%ALLUSERSPROFILE%Application DataMicrosoftNetworkDownloaderqmgr*.dat”

- This command will delete the qmgr*.dat files.
If the above mentioned commands fail to resolve the issue, apply these commands one by one followed by Enter key on each time: –

- This will rename the above folders to *.BAK.
Now we will reset the BITS services and Windows Update services.
- To reset BITS services type the following command after blinking cursor in Command Prompt window: –
- sc.exe sdset bits D:(A;;CCLCSWRPWPDTLOCRRC;;;SY) A;;CCDCLCSWRPWPDTLOCR SDRCWDWO ;;;BA)(A;;CCLCSWLOCRRC;;;AU)(A;;CCLCSWRPWPDTLOCRRC;;;PU)
- Press Enter to execute the command.
- To reset Windows update service, type the following command after blinking cursor in Command Prompt window: –
- sc.exe sdset wuauserv D:(A;;CCLCSWRPWPDTLOCRRC;;;SY)(A;;CCDCLCSWRPWPDTL OCRSDRCWDWO;;;BA)(A;;CCLCSWLOCRRC;;;AU)(A;;CCLCSWRPWPDTLOCRRC;;;PU)
Restart BITS and Windows Update services
Now, type the following commands one by one and press Enter after each command:
1.regsvr32.exe atl.dll
2.regsvr32.exe urlmon.dll
3.regsvr32.exe mshtml.dll
4.regsvr32.exe shdocvw.dll
5.regsvr32.exe browseui.dll
6.regsvr32.exe jscript.dll
7.regsvr32.exe vbscript.dll
8.regsvr32.exe scrrun.dll
9.regsvr32.exe msxml.dll
10.regsvr32.exe msxml3.dll
11.regsvr32.exe msxml6.dll
12.regsvr32.exe actxprxy.dll
13.regsvr32.exe softpub.dll
14.regsvr32.exe wintrust.dll
15.regsvr32.exe dssenh.dll
16.regsvr32.exe rsaenh.dll
17.regsvr32.exe gpkcsp.dll
18.regsvr32.exe sccbase.dll
19.regsvr32.exe slbcsp.dll
20.regsvr32.exe cryptdlg.dll
21.regsvr32.exe oleaut32.dll
22.regsvr32.exe ole32.dll
23.regsvr32.exe shell32.dll
24.regsvr32.exe initpki.dll
25.regsvr32.exe wuapi.dll
26.regsvr32.exe wuaueng.dll
27.regsvr32.exe wuaueng1.dll
28.regsvr32.exe wucltui.dll
29.regsvr32.exe wups.dll
30.regsvr32.exe wups2.dll
31.regsvr32.exe wuweb.dll
32.regsvr32.exe qmgr.dll
33.regsvr32.exe qmgrprxy.dll
34.regsvr32.exe wucltux.dll
35.regsvr32.exe muweb.dll
36.regsvr32.exe wuwebv.dll
These command will re-register the files for the BITS service and the Windows Update service.
- To reset Winsock, enter the command: netsh winsock reset.
- Press Enter.
- Now execute these command to restart BITS service and the Windows update service: –
- net start bits
- net start wuauserv
- Press Enter.
That’s all.
