How To Sharing Files or Folders over Network in Windows 10 / 8. If you want to work in a group, then Windows 10 / 8 provides you a option to sharing Files between computers online and called Windows share. Also Network Discovery feature should be in Enable mode. But condition is that you have to check workgroup name for file share over Network. In this article, we will discuss how will you share Files or folder as well as file transfer online or file share online.
How to fix Network Discovery is turned off Error in Windows 10
Methods To Share File or Folders over Network in Windows 10 / 8
- How to check Workgroup Name
- Share files using File Explorer
- File Sharing Through Advance Setting
- Howto share files over the network without a password
- How to share files using Homegroup
- How to share files using OneDrive
Check Workgroup Name
First of all we have to check the name of workgroup in which your will work. Here is the procedure to check workgroup name: –
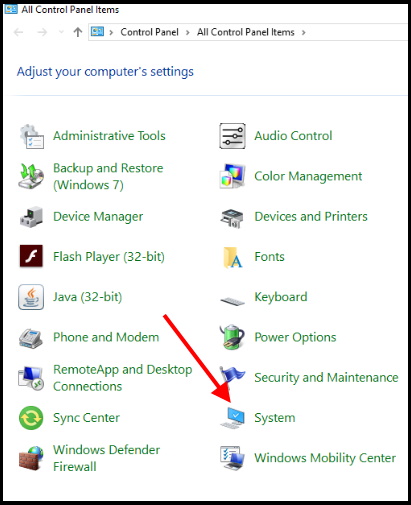
- Open Control Panel.
- Find out System and click on it.
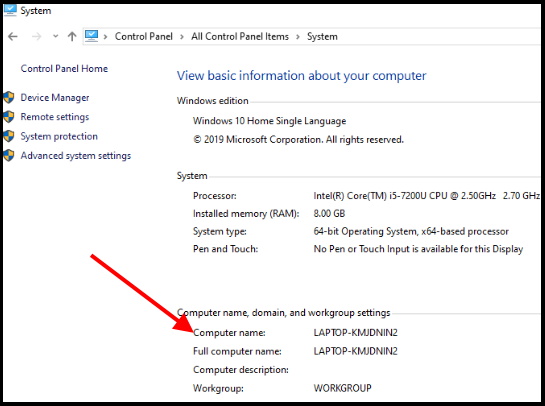
- Here you will see the properties of the computer such as Name, Workgroup name, computer details etc. You should check workgroup name.
Share Files using File Explorer in Windows 10 / 8
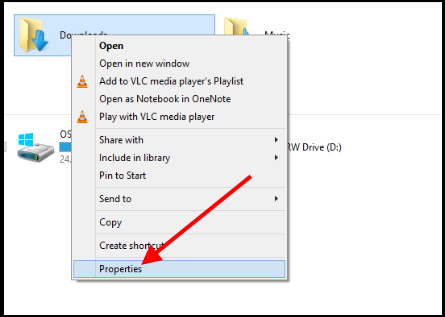
- Right-click on File or folder or drives which you want to share.
- Then Select Properties.
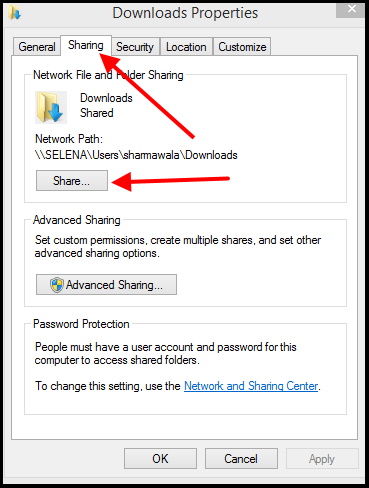
- Here, click on the Sharing tab at the top.
- Now a new windows will appear. You have to click on the share button and further proceed to file sharing window.
- Now select Everyone from drop-down menu and hit the Add button. It will add Everyone group in file sharing list.
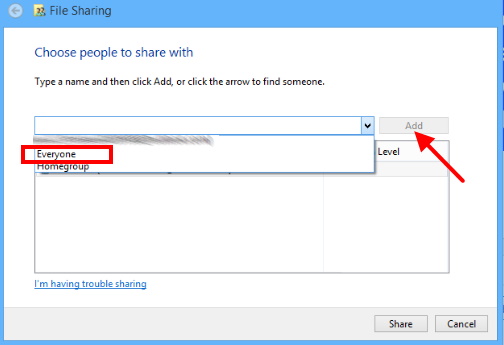
- Now you have to grant permission level. So right click on the Everyone.
- Choose Read/Write from right click context menu.
- At last, click on Share button at the bottom to allow to share the folder on the network.
Sharing files through Advance Settings in Windows 10 / 8
This is the another way to share files or folders over Network in windows 10 / 8. You may act this using advance setting option. Follow these steps:
- Open File Explorer.
- Locate the folder you want to share.
- Right-click the item, and select Properties.
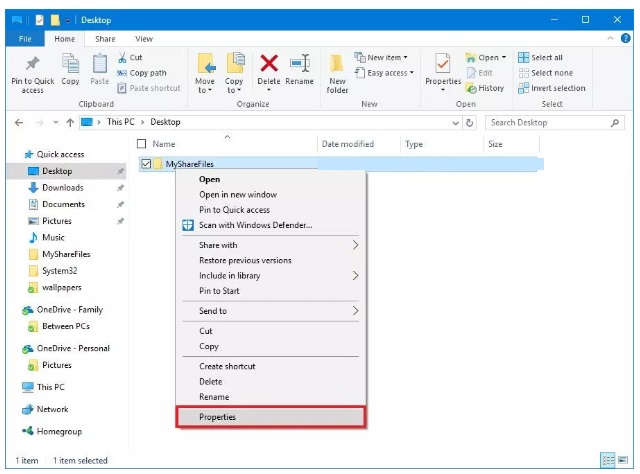
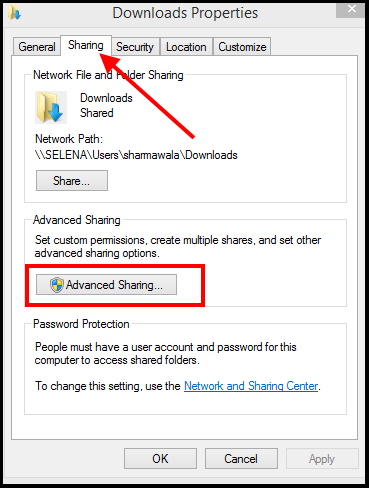
4. Click the Sharing tab on the properties window.
5. Now Click the Advanced Sharing button.
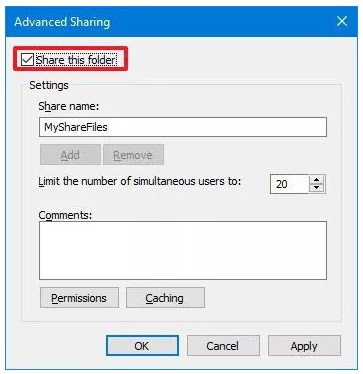
6. Check the Share this folder option.
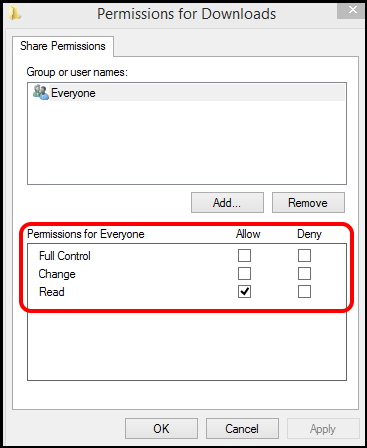
7. During file sharing over network, other group members have only read-only access to the content which you want to share. But it can be changed through editing in Permission level button.
8. In Permission window, you’ll see Everyone group set as default feature. Here you have an option to customize permission in respect of a particular user and group. many users want to open, delete, edit and create folders or files, you should make check on the Read and Change option under Allow.
9. Click Apply and then OK.
Files sharing over network with a Specific user
Many users want to change the default files sharer from “Everyone” to other “Specific user” specially by name. In this case, you should follow step mentioned at 8 above and then proceed to these steps: –
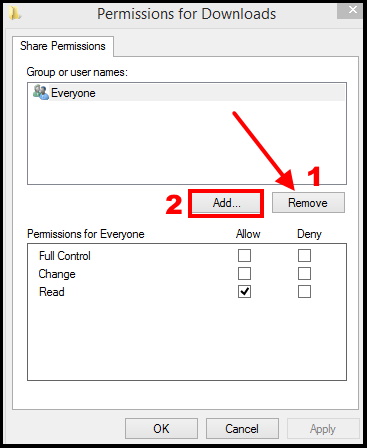
- Choose Everyone group and click on Remove option.
- Thereafter Click on Add button.
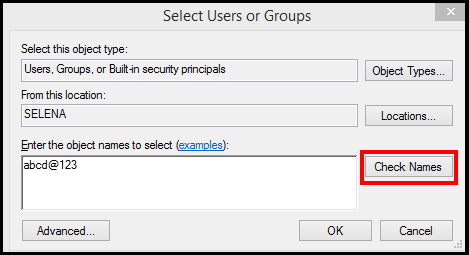
3. Enter name of user that you wish to share files and folders.
4. Click on Check Name option.
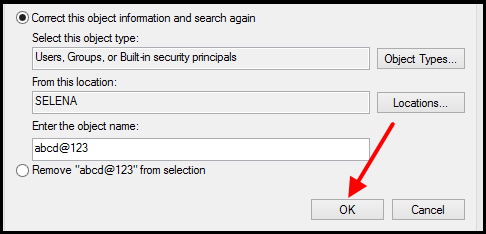
5. Click on OK.
6. Choose user account. You will find Read permission is marked by default. If you want the user to be able to edit, delete, and create new files, make sure to also check the Change permission option.
7. Click Apply.
8. Click OK.
How to Share Files or Folders Over Network without a Password
Whenever, you share files or folders over network, it is secured with a user id and password. This means only people who have an account and password on the computer may access over shared files and folders.
If you want to online file sharing, it is possible to disable password option. Here, I am describing it step by step: –
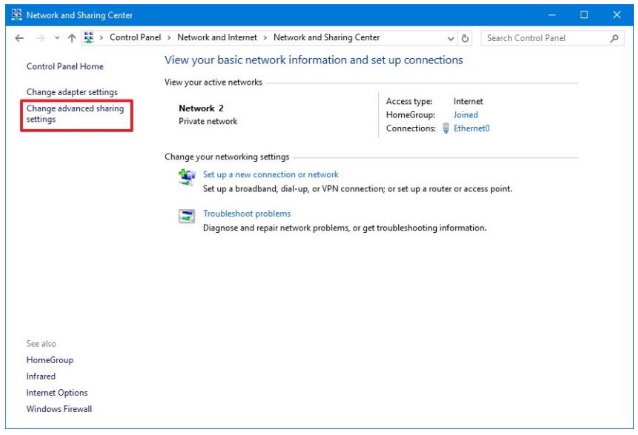
- Open Control Panel.
- Click on Network and Internet.
- Click on Network and Sharing Center.
- On the left pane, click the Change advanced sharing settings link.
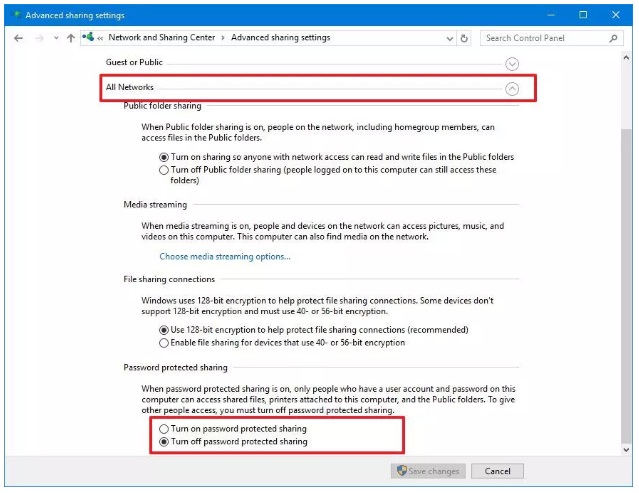
5. Elaborate All Networks.
6. Select the Turn off password protected sharing option.
7. Click Save changes to complete the task.
How to share files or Folder over Network using Homegroup
This function is only available on older versions of the operating system. i.e Windows 7. You should first create a homegroup.
Create a Homegroup
To create a Homegroup on your local network, do the following:
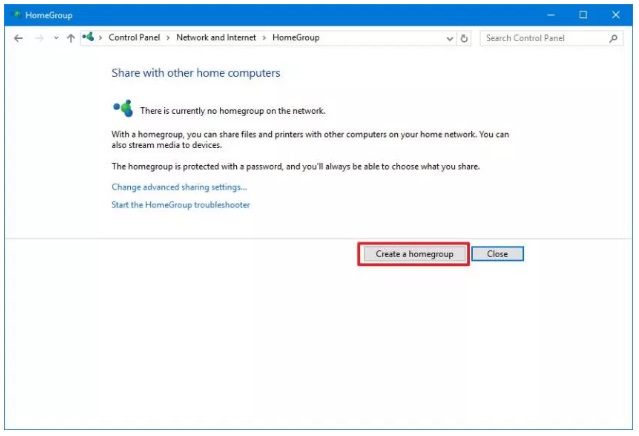
- Open Control Panel.
- Click on Network and Internet.
- Select Homegroup.
- Click the Create a homegroup button.
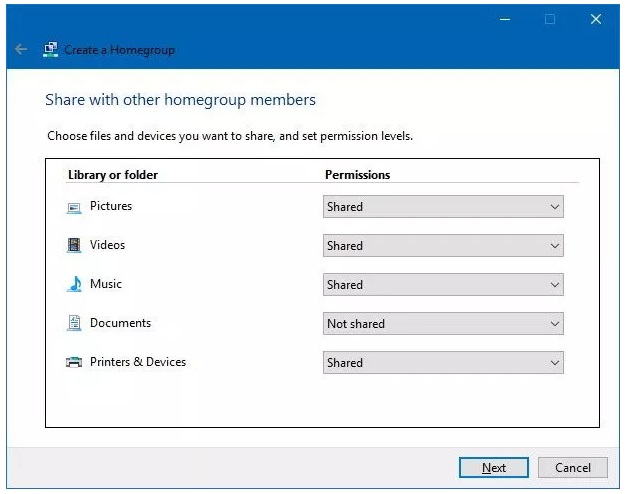
5. Click Next.
6. Use the drop-down menu to select which folders and resources (Pictures, Videos, Music, Documents, Printer & Devices) you want to share. If you don’t want to share an item, make sure to select the Not Shared option.
7. Click Next.
8. Don’t forget to note the Homegroup password as you’ll need it to join other computers, and click Finish to complete the task.
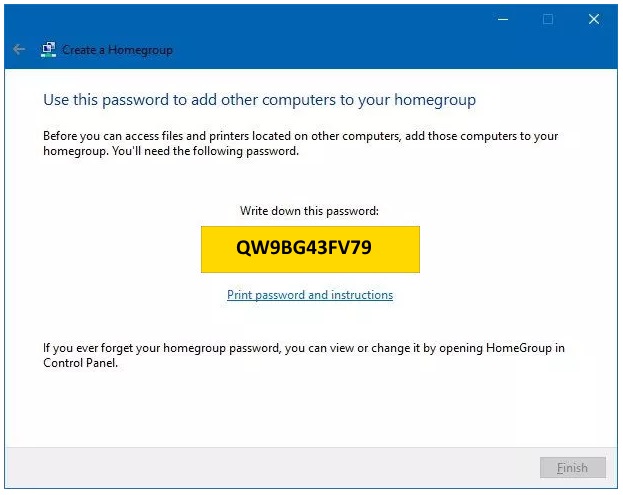
Joining a Homegroup
It is necessary to join a homegroup to access the files which you are sharing Here I am explaining the procedure to complete this task: –
- Open Control Panel.
- Make a Click on Network and Internet.
- Click on the Choose homegroup and sharing options link.
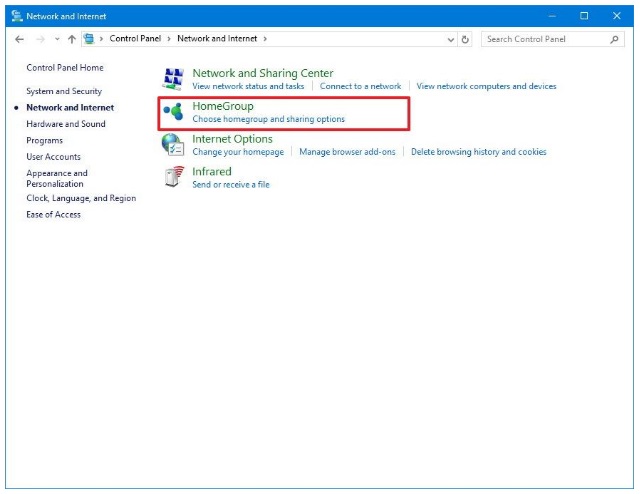
4. Click the Join now button.
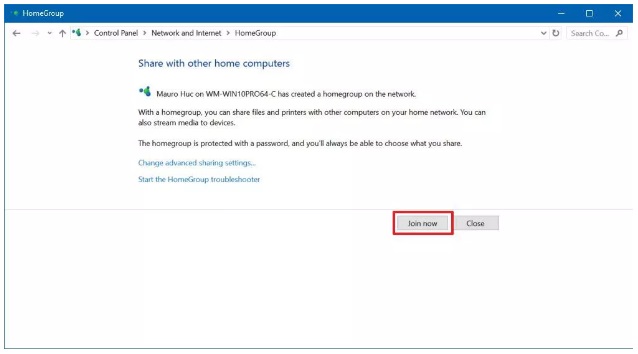
5. Follow the wizard and enter Homegroup password to complete task.
Sharing files on a Homegroup
Above, you will have understand about creating homegroup as well as joining homegroup. Now we will see how to share folder over network on a homegroup
Step1: Open File Explorer.
Step2: Locate the content you want to share and Right-click on it and select Share with.
Step3: Here, you will find a number of sharing options, including Homegroup (view) and Homegroup (view and edit). If you only want users to have read permissions to your files, then select Homegroup (view) and users to have read and write permissions, which also allows them to delete and create files and folder, then select Homegroup (view and edit).
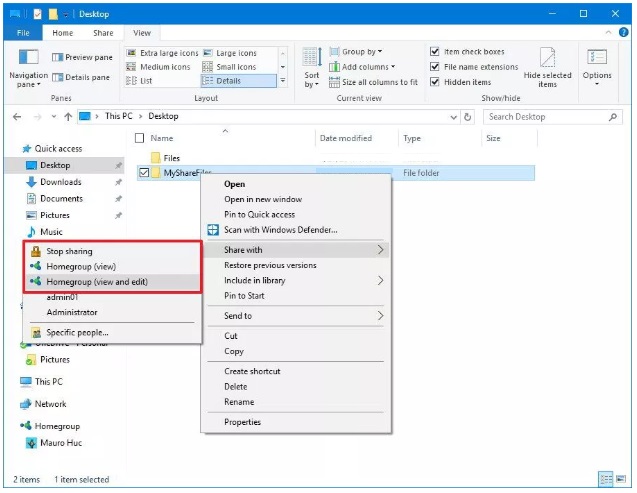
If you want to revert on previously shared folder, then right-click on the folder, again click the Stop sharing option.
How to Sharing Files or Folder over Network using OneDrive
Now we will see how to share files in Onedrive. You can also share onedrive folders over network with other people across your network or around the world using OneDrive. Here is how to share with onedrive : –
- Open your OneDrive folder in Windows 10 and locate the folder you want to share.
- Then, Right-click on the folder and make a click on Share a OneDrive link, which will automatically create and copy a short link to the clipboard.
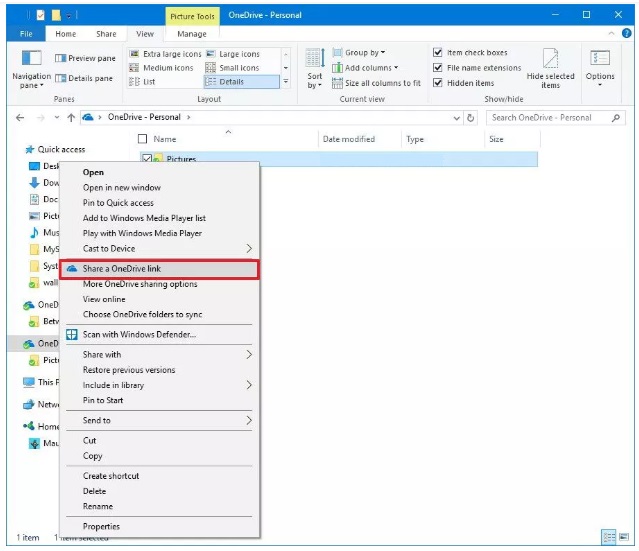
4. Now Right-click and paste the link to an email or social media where you want to share.
The possibility exists to the users to be able to view and edit the content inside of a OneDrive folder, you’ll need to share the folder using OneDrive on the web. Follow the under mentioned steps: –
- Open OneDrive on your web browser.
- Navigate to the file or folder you want to share.
- Right-click the item and select Share.
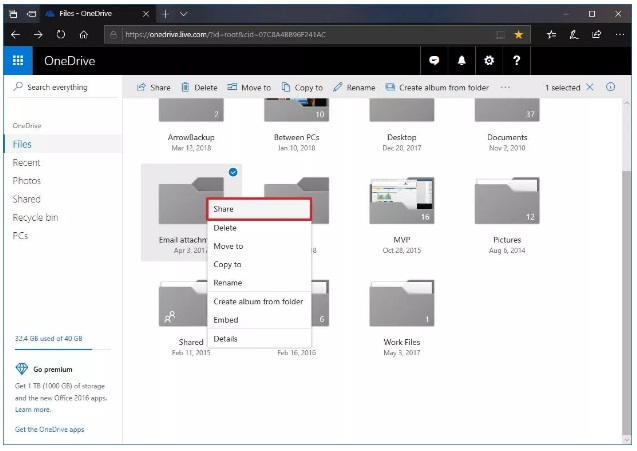
4. Click the Anyone with this link can edit this item link and make sure Allow editing is ticked.
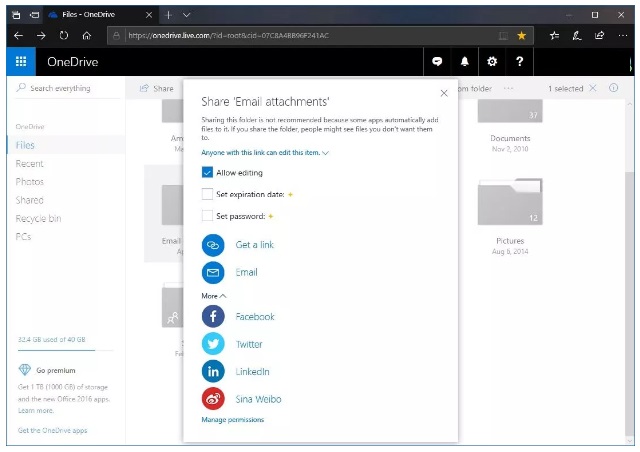
5. Select one of the link via email, or if you click More, you can select to share the item in a number of social networks.
6. Follow the on-screen directions share the item and to complete the task.
Thnx…

2 thoughts on “Tips : Sharing Files or Folders over Network in Windows 10 / 8”