How to Fix This PC Can’t Run Windows 11 Error. Windows 11 has now been officially launched with many new improved features and user’s excitement is on high. Accordingly Microsoft has launched Windows 11 PC Health Check through you can check your PC Compatibility to run Windows 11 in their system. You have Minimum Hardware requirements to download and install Windows 11.
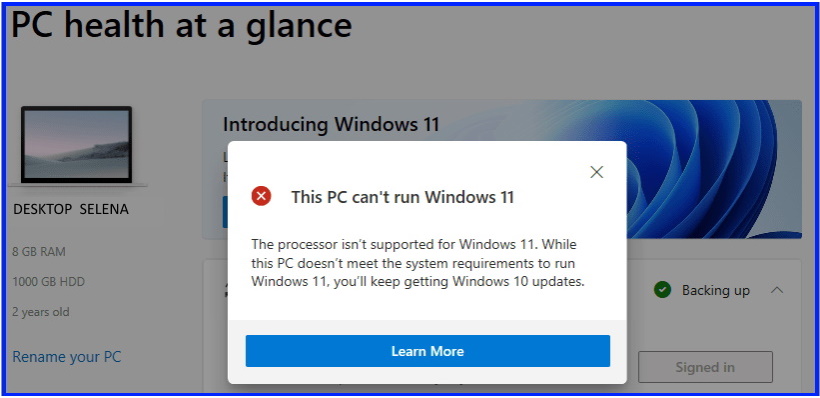
But, even after applying PC health check up and fulfill the minimum system requirements, many users are facing difficulties in installation of Windows 11 by applying setup process or when they try to use health checkup.When They try to check PC compatibility, an error message appear like such screenshot.
What are the Common Errors causing failed to Install Windows 11
If you have applied the PC Health Checkup to check whether your system is compatible to install Windows 11 or not, various errors appear on your screen dully quoted “This PC Can’t Run Windows 11”.
Error-1: Trusted Platform Module (TPM) 2.0 required for Windows 11
TPM 2.0 is a minimum system requirement to install Windows 11. Your device should support Windows 11 TPM 2.0, otherwise you will receive the compatibility error “TPM 2.0 is required“.
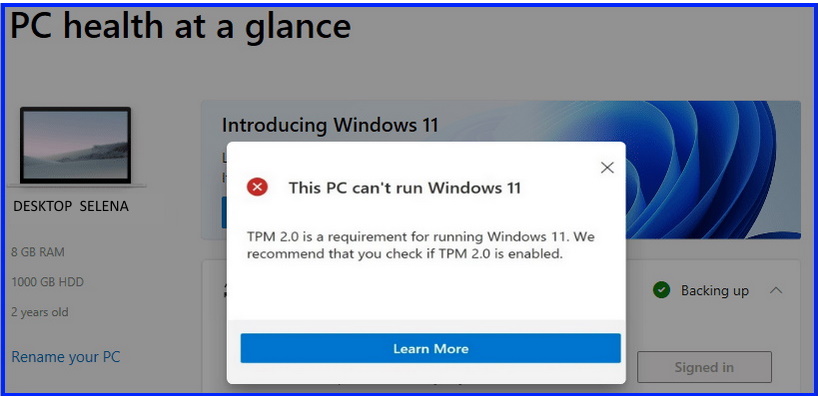
To get rid of this issue, you should first check in your Windows 10 system that TPM 2.0 is installed or not thereafter enable it.
How to Check status of TPM 2.0 in Windows 10
TPM stands for Trusted Platform Module and used for the purpose of your Windows 10 security. It is a hardware based security feature that authenticate your system. Your computer must have a Trusted Platform Module (TPM) chip if you want advance security features in your system.
To check status of TPM 2.0, follow these steps: –
- Press Windows key + R shortcut key.
- Run command will open now.
- Type devrmgmt.msc in it and click on Ok button.
- Device Manager window is open.
- Here go to the Security devices section.
- Make a click on it to expand.
- You will find the Trusted Platform Module 2.0 in your system.
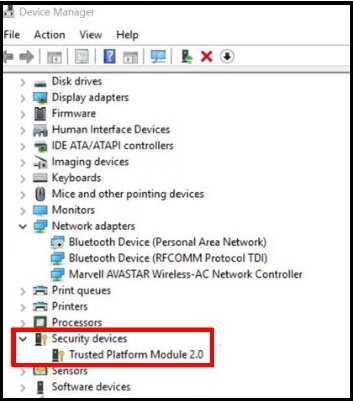
If you don’t find Trusted Platform Module 2.0 in your system, Here is the process to enable TPM 2.o in your Windows 10 system.
How to Enable Windows 11 TPM 2.o to Fix “This PC Can’t Run Windows 11”
- Open Windows Setting by pressing Win logo + I shortcut key.
- Select Update & Security.
- Now from the menu of left side, select Recovery option.
- Go to right pane and click on Restart Now button located under Advanced Startup option.
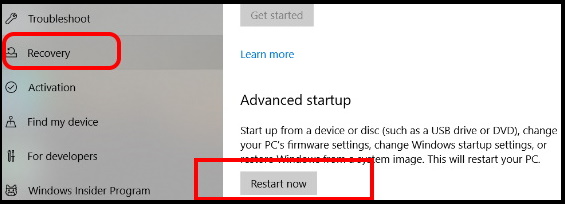
- As soon as you click Restart now tab, your PC will start to boot.
- While rebooting, you will access to Advance Startup Screen.
- Here select the Troubleshoot option.
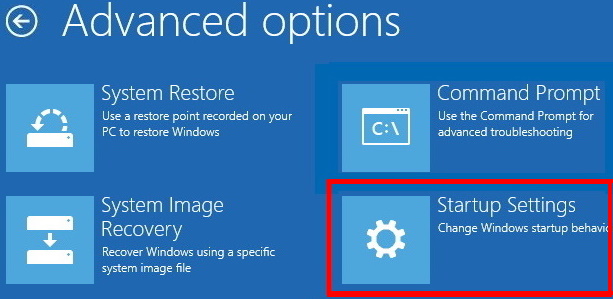
- Under troubleshoot, tap on Advanced options at the bottom part.
- Select on Startup Settings.
- Here from the available list, go to the system information.
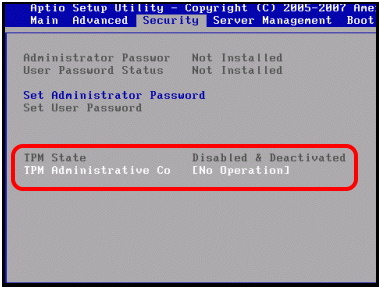
- Look for TPM state.
- If you find it in disable mode, click on it and make enable.
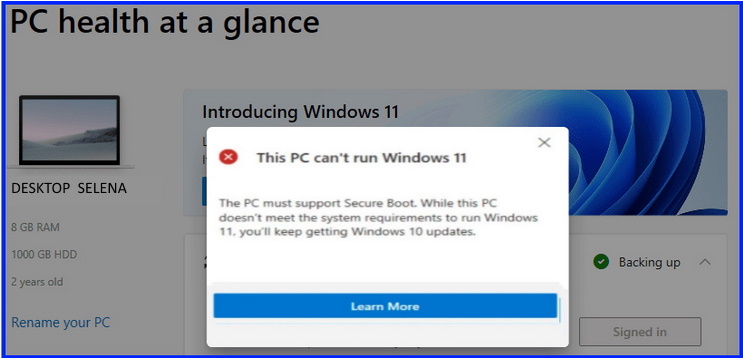
Error-2: This PC must Support Secure Boot
Secure boot should be in Enable mode in your system to obtain latest version of Windows. Secure Boot in windows 11 / 10 is an additional security layer which facilitate the system to boot by the software duly verified through OEM (Original Equipment Manufacturer). The aim of Secure boot is to restrict the malicious objects to boot while startup of your computer. If you turn on this feature, this feature certified by Microsoft will start.
How to Enable Secure Boot to Fix This PC Can’t Run Windows 11
- Restart your Windows 10 system.
- While Startup, hit on Esc key and enter into Startup Menu.
- Thereafter find out the key for entering into the BIOS Setup wizard.
- Click on the key.
- You may reach to BIOS settings directly from the Boot Screen. For this, press F8 or F10 keys.
- Thereafter go to the Advanced tab from BIOS Setup.
- Here, Click on the Boot Options.
- Find out Secure Boot from the options list.
- Make check mark against the option.
- At the end, click on Save button to save the changes, you have made in BIOS Settings.
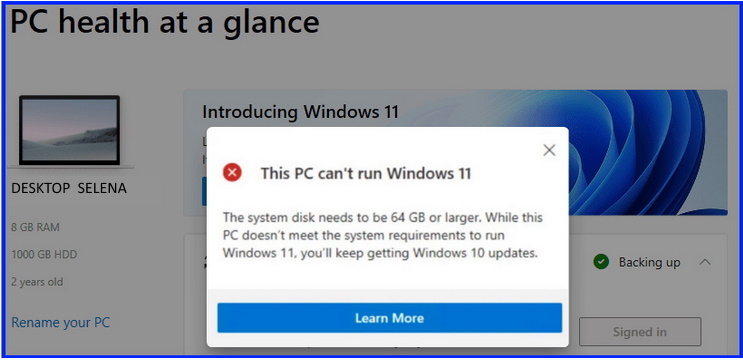
Error-3: The System disk needs to be 64 GB or Larger
You will have to maintain the minimum size requirement of your disk while installing Windows 11 or upgrading from Windows 10. Although Windows 11 PC Health Check also includes the size of the disk partition in your system. If it’s lesser than 64 GB, than you need to expand and increase its volume to 64 GB or more to be able to install Windows 11 on your system. Otherwise you will receive such error messages on your screen till the fulfill of Minimum disk requirement for installing Windows 11.
Other Solution of This PC Can’t Run Windows 11 Error
Here are the some other fixes of This PC can’t Run Windows 11 error. You you are still facing this issue even after fulfill all the minimum system requirements and don’t want to change BIOS settings, go through these tips: –
Use Windows 11 ISO Mount to Fix This PC Can’t Run Windows 11 Error
You will have to Download ISO files in your Windows 10 computer and thereafter change appraiserres.dll file in the Windows 11 Bootable ISO USB device. This process will bypass the minimum hardware requirements as well as change in BIOS settings. Follow these steps: –
- At first, create a new folder on the drive.
- Rename it as Windows 11.
- Thereafter go to the folder in which you have kept all the saved earlier downloaded Windows 11 ISO files.
- Copy all such files which you have downloaded earlier as Windows 11 ISO files. Thereafter paste all the files to the recently created folder.
- Then, launch any web browser from Here.
- From this web page in Windows 10, download and install Windows 10 ISO file.

- When downloading process is over, make a right-click on that file and choose the option Mount.
- Now navigate the Sources folder.
- In Windows 10 ISO source folder, you will find appraiserres.dll file.
- Make a right-click and then choose Copy option.
- Thereafter find out Windows 11 folder here and open Source folder from here.
- Then Paste appraiserres.dll file here.
- Here you will find appraiserres.dll file in Windows 11.
- A small window box will open duly asking Replace or Skip Files.
- Choose the option Replace the files in the destination and you should wait for a while.
- When the process finishes, Restart your system and install the Windows 11 by using the Boot Device feature from the Startup Menu.
Go through Registry Editor to Bypass SecureBoot and TPM
If you are well aware about Windows Registry Editor, you can go through it and needn’t enabling SecureBoot as well as TPM 2.0. But you should more careful while changing in Registry. Create a full backup of Registry to avoid any unwanted circumstances. Follow these steps: –
- Open Run Command box by pressing Win + R shortcut key.
- Type regedit in it and press Ok button.
- In Registry Editor window, navigate the following path: –
- HKEY_LOCAL_MACHINE > SYSTEM > Setup
- Thereafter make a right click on the Setup option and go to the New > Key.
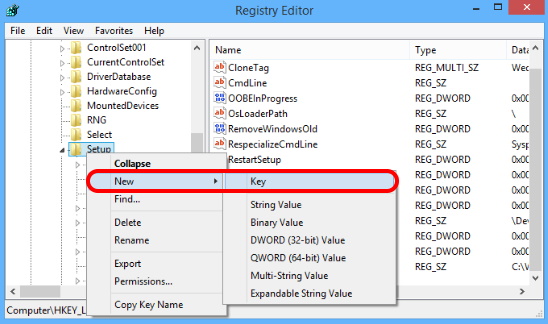
- Put the name of this key as LabConfig.
- Then go to the right pane of same window.
- Apply a right click on blank space and go through New > DWORD (32-bit) Value.
- Put the name of this key as BypassSecureBoot.
- Apply the same step once more and name the key as BypassTPM.
- Now open BypassSecureBoot.
- Enter the value as 00000001.
- The same value will be put into the BypassTPM key.
- Now you can easily Install Windows 11 without enabling TPM 2.0 as well as SecureBoot.
That’s all.

3 thoughts on “This PC Can’t Run Windows 11 Error Reason and Solution”